Introduction
As you know, Sysprep is used to generalize the Windows installation by removing system-specific information, making it ready for imaging and deployment to different hardware. When using Sysprep in conjunction with an unattended answer file, you can customization of your deployment process. This combination is commonly employed in scenarios where you want to create a master image for deployment to multiple machines while ensuring a consistent and automated setup.
This blog will guide you through step-by-step how to use Sysprep with an unattended answer file for Windows deployment. This tutorial will use Windows 11 Pro, version 23H2 as an example. In addition, if you want to learn how to Sysprep a system without the answer file, check out this post.
Windows Answer File
We use Answer File or Unattended File to automate the Windows Setup process during the next deployment. It provides answers to questions that Setup would normally ask, such as language, product key, and user settings. In addition, your unattended file can include additional customizations beyond Sysprep, such as setting up user accounts, configuring networking, and specifying application installations.
The unattended file is especially crucial during the OOBE (out-of-box experience) phase when the system is first booted after deployment. It helps to automate the setup process, making it a seamless experience for end-users.
Step 1: Prepare the Windows Installation
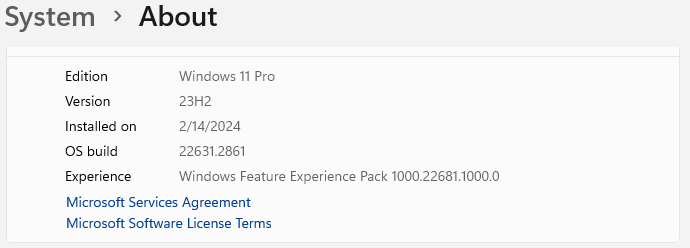
In this step, we install Windows 11 Pro, version 23-H2 on a reference machine with all necessary updates, drivers, and applications. Make any customizations you want to include in the final image. Below is a screenshot of the Reference VM:

Reference VM
Step 2: Preparing Answer File
Next, we create an Unattended File. You can use the Windows System Image Manager (SIM), which is part of the Windows Assessment and Deployment Kit (ADK), to create an unattended answer file (e.g., Unattend.xml). Customize settings such as product key, time zone, user accounts, and other configurations.
Alternatively, you can go to this website, it helps generate a Windows Answer File for you. In this tutorial, we will use an Unattended File for Windows 11 Pro, version 23H2. Our example answer file will bypass OOBE, create a user account named “Staff” under Users Group, device name is “Test-PC”.
Place the Answer File: Save the unattend.xml file in the appropriate location. For manual Sysprep, choose a location that suits your needs. However, if deploying the image to multiple systems, consider including it in the Windows installation media or specifying its location in the Sysprep command. In the case of using a VM, ensure the unattend.xml file is stored in a location accessible from the VM.
Step 3: Sysprep the Reference Machine
Now we are ready to run Sysprep with the answer file. Open Command Prompt as an administrator inside the Reference PC. Navigate to the directory containing Sysprep. The typical path is %windir%\system32\sysprep\
Run the Sysprep command, specifying the location of your answer file using the /unattend parameter. The command typically looks like this:
sysprep.exe /generalize /oobe /shutdown /unattend:PATH_TO_UNATTEND_FILE\unattend.xml
Replace PATH_TO_UNATTEND_FILE with the actual path where your unattend.xml file is located within the VM.
Note: If you Sysprepping a virtual machine (VM), it’s recommended to include the /mode:vm parameter in the Sysprep command:
sysprep.exe /generalize /oobe /shutdown /unattend:PATH_TO_UNATTEND_FILE\unattend.xml /mode:vm
See example below: You will notice that the answer file named unattend.xml located at C:\unattend.xml
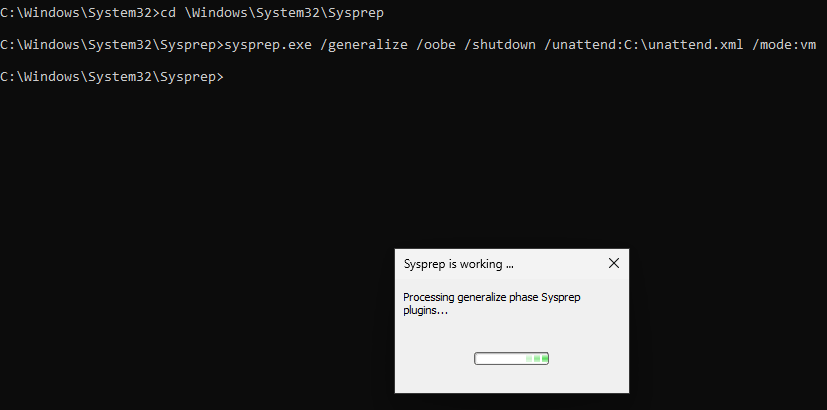
After running the command, Sysprep will execute, applying configurations specified in the answer file. It will generalize the system, remove system-specific data, and prepare it for imaging or deployment. Also, Depending on your Sysprep command options (/shutdown or /restart), the VM will either shut down or restart after Sysprep completes. In this case the VM will shutdown after sysprep completes.
Step 4: Capture and Deploy the Image
For Physical Machine
Capture the Image:
If you Sysprepped the physical machine and it has shut down, the next steps typically involve capturing the system image. You’ll need to boot the physical machine into a capture environment where you can run imaging software to capture the system image. This capture environment could be a Windows PE (Preinstallation Environment) or a bootable USB drive containing imaging software.
Once booted into the capture environment, launch your imaging software. Popular choices include Microsoft’s Deployment Image Servicing and Management (DISM), Clonezilla, or other third-party imaging tools. These tools allow you to select the source disk (the disk of the Sysprepped physical machine) and specify where you want to save the captured image. You may also need to configure additional settings depending on the software you’re using.
When you start the capture process, the imaging tool will create an image file containing a snapshot of the Sysprepped system. This image file can include the operating system, installed applications, and any customizations made to the system.
Once the capture process is complete, save the captured image to a storage location. This could be a network share, an external hard drive, or another storage device accessible from your deployment environment.
Deploy Captured Image (Optional)
You can deploy images to multiple systems using deployment tools like Microsoft Deployment Toolkit (MDT), Windows Deployment Services (WDS), or third-party deployment solutions.
We will discuss more about capturing and deploying images for physical machines in a later post. For now, this post focuses on the virtualized environment.
For Virtualized Environments
In virtualized environments, such as VMware vSphere, Microsoft Hyper-V, or VirtualBox, the process of creating and deploying VM clones is often simpler compared to physical machines. In this post we will shows you two ways to deploy:
Method 1
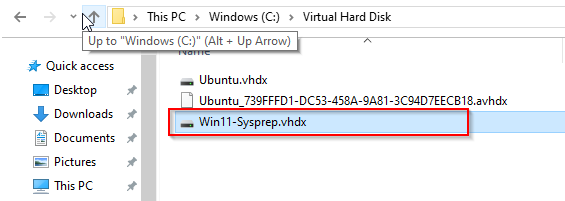
VM Cloning: After Sysprep the reference VM with the answer file, you create a clone of its virtual hard disk (VHDX if you are using Hyper-V). This clone will contain the generalized system image, ready to be deployed to the target VM
As you can see, we have cloned the VHDX file and named it Win11-Sysprep.vhdx
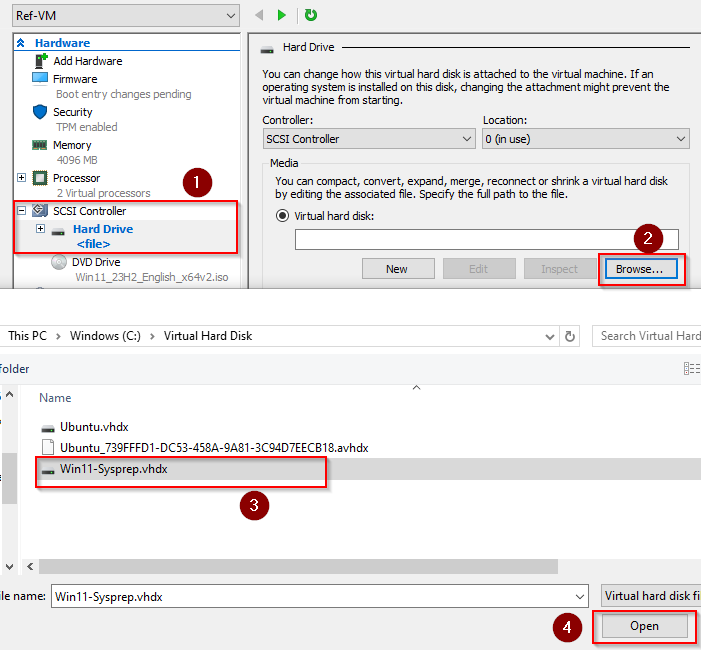
Deploy the cloned VM: attach the cloned virtual hard disk to the target VM. Then, start the VM, it will boot up with the same configuration as the original VM that was Sysprepped. This process is often referred to as “golden image deployment” in virtualized environments.
Example: attach VHDX to target VM
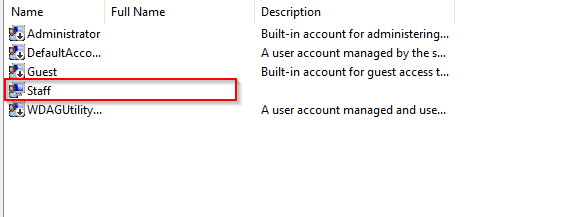
Start the target VM, notice that Adobe Reader is installed and ready to use. Also, user account named “Staff” under Users Group, device name is “Test-PC”.
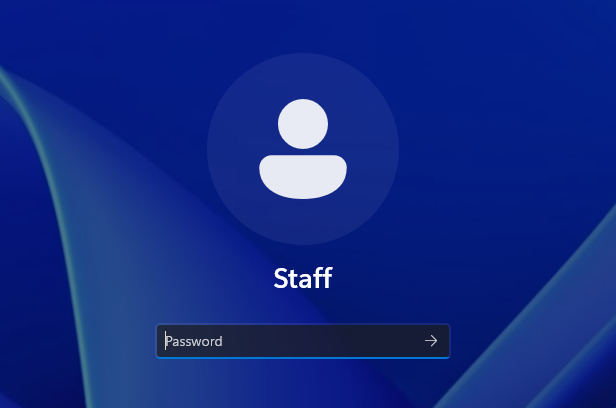
Target VM

Target VM
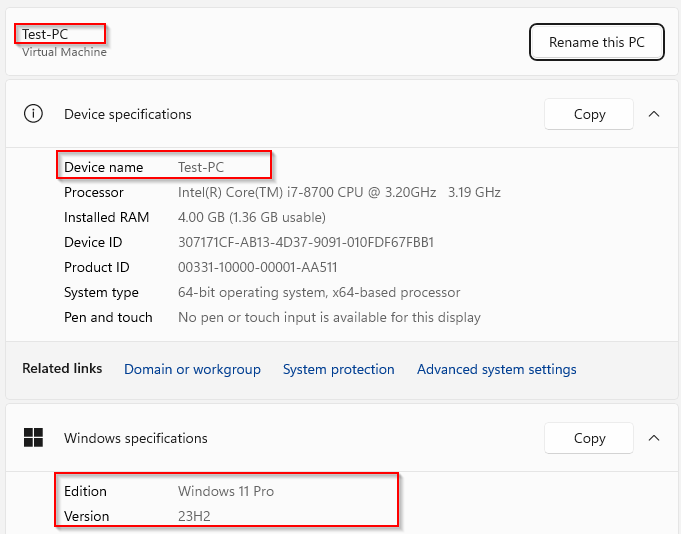
Note: for mass deployment scenarios, you need to deploy the Sysprepped image to multiple VMs simultaneously or manage deployments centrally, using deployment tools like Microsoft Deployment Toolkit (MDT), Windows Deployment Services (WDS), or other third-party solutions is recommended. We will discuss more details about this topic in the upcoming blogs.
Method 2
In this method, we place the unattend.xml file to the VHDX file in the C:\Windows\Panther directory after running Sysprep. Here’s how you can do it:
Copy Answer File to Panther Folder: After the system has shut down, Copy your unattend.xml file into the C:\Windows\Panther directory. Make sure the file is named unattend.xml
So here we just sysprep a Windows 11 Pro VM, its VHDX named Win11-Sysprep.vhdx. You need to mount the VHDX file and insert the unattend.xml.:
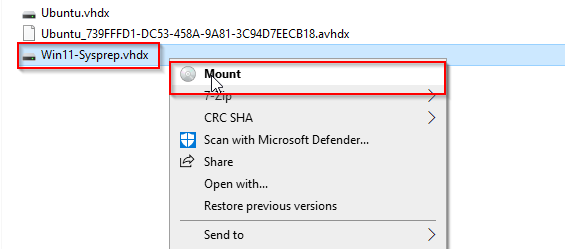
Or you can you Powershell to mount the VHDX , copy the unattend.xml and dismount the VHDX
$UnattendedPath = "C:\Users\Administrator\Downloads\unattend.xml"
$VHDXPath       = "C:\Virtual Hard Disk\Win11-Sysprep.vhdx"

# Mount VHDX and get drive letter
$VHDXDriveLetter = (Mount-VHD -Path $VHDXPath -PassThru | Get-Disk | Get-Partition | Get-Volume).DriveLetter
$VHDXDriveLetter = $VHDXDriveLetter.Trim()

Start-Sleep -Seconds 3

# Copy Unattended file
$UnattendDestination = "$($VHDXDriveLetter):\Windows\Panther\unattend.xml"
Copy-Item $UnattendedPath -Destination $UnattendDestination -Verbose

# Dismount VHDX
Dismount-VHD $VHDXPath
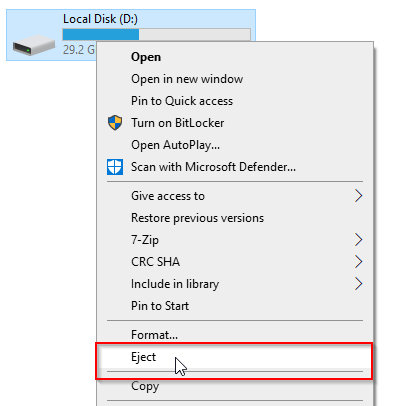
Place the Answer File: Now Copy your unattend.xml file into the C:\Windows\Panther directory. Make sure the file is named unattend.xml. When you done, make sure to dismount/eject the VHDX.
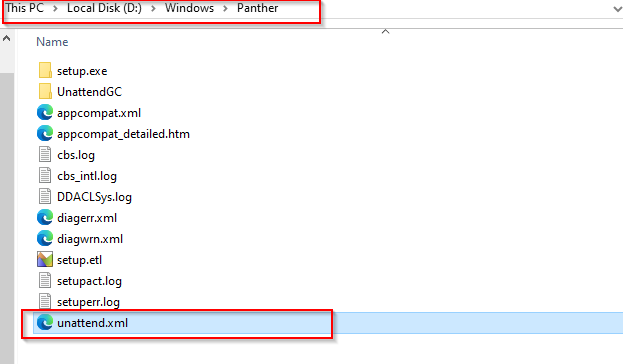
Boot Up the Target VM: Once the unattend.xml file is placed in the Panther directory, attach the VHDX to the target VM and boot up the system. During the setup process, Windows Setup will detect the presence of the unattend.xml file in the Panther directory and use it to automate the setup process according to the configurations specified in the file.
Below are screenshots of the Target VM after booting up, as you can see, Adobe Reader is installed, the system name is “Test-PC” and user account named “Staff” under Users Group.
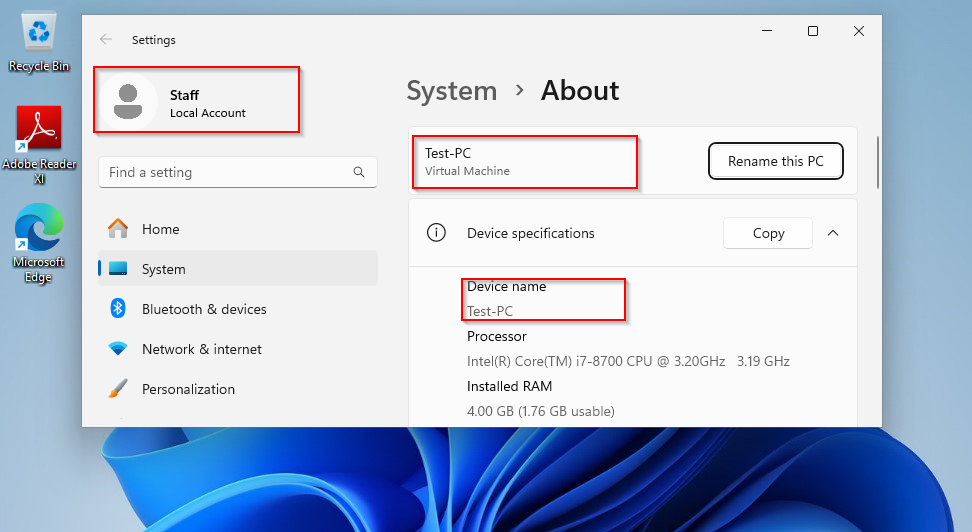
Target VM
Conclusion
To sum up, mastering the Sysprep process and leveraging answer files for automated deployment are essential skills for system preparation and deployment. By following the steps with different methods outlined in this guide, you are ready to streamline your deployment workflows, ensuring consistency and reliability across your infrastructure.
