Introduction
FSMO (Flexible Single Master Operations) roles are critical components in an Active Directory environment. When upgrading or transitioning domain controllers, it’s essential to transfer these roles to ensure a smooth operation.
Go to this post if you want to learn what are FSMO Roles and how to manage them.
In this guide, we will walk you through the step-by-step process to transfer FSMO roles between Domain Controllers.
Lab Topology
Here is our lab setup (techexample.local) for the FSMO roles transfer:
| Server | IP Address | Default Gateway |
| DC01 | 192.168.1.100 | 192.168.1.254 |
| WS01 (Secondary DC) | 192.168.1.101 | 192.168.1.254 |
To learn how to setup this lab, go here.
Let’s continue!
Step-by-Step Guide to Transferring FSMO Roles
Prerequisites
When transferring FSMO roles:
- Make sure both source and target Domain Controllers must be online and communicating for a smooth transfer. In this lab, the Source DC is DC01 and the target DC is WS01.
- Ensure proper network connectivity and administrative credentials.
- Back up AD environment before making changes to FSMO roles.
Transferring Domain-Specific FSMO Roles
Step 1: Connect to the Destination Server
- Log in to the server WS01. This will be our destination server. The target domain controller WS01 will receive the FSMO roles.
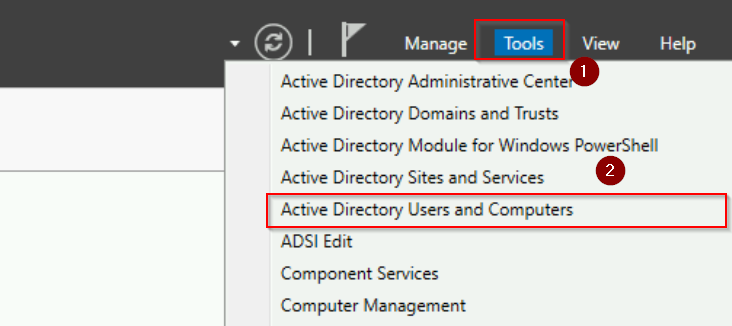
- Open Server Manager > Tools menu > Active Directory Users and Computers.
Step 2: Access Operations Masters
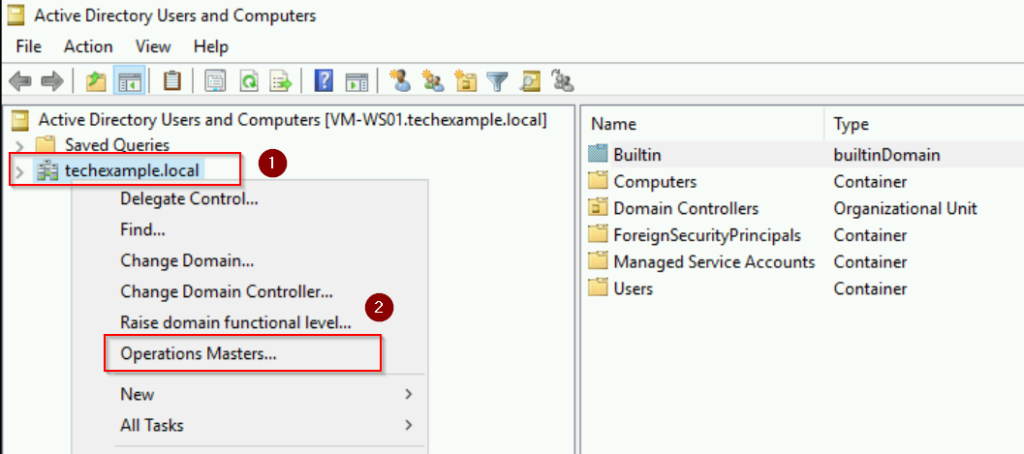
- In the Active Directory Users and Computers window, right-click your domain.
- Select Operations Masters from the context menu.
Step 3: Transfer the RID Master Role
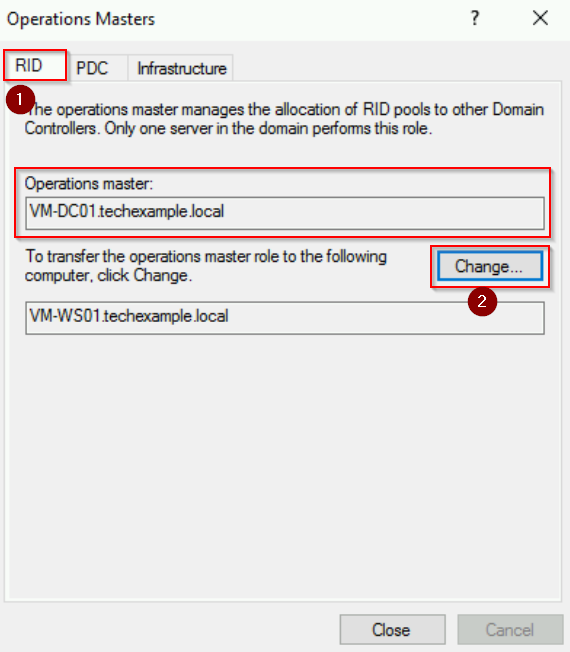
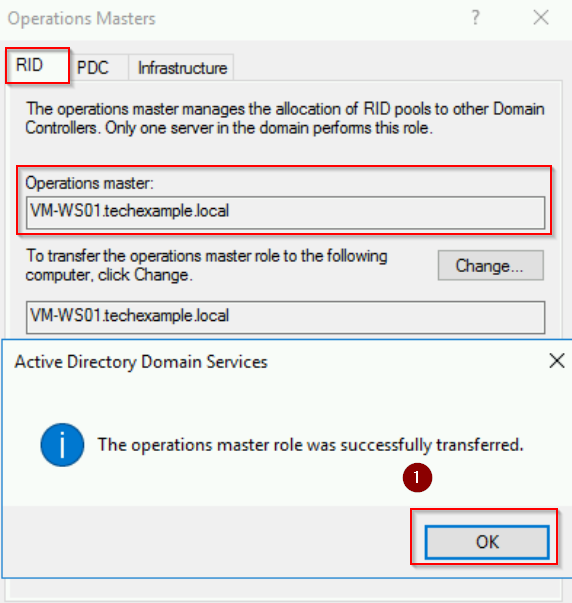
- In the Operations Masters dialog, go to the RID tab.
- Note the current role holder, which is VM-DC01.techexample.local.
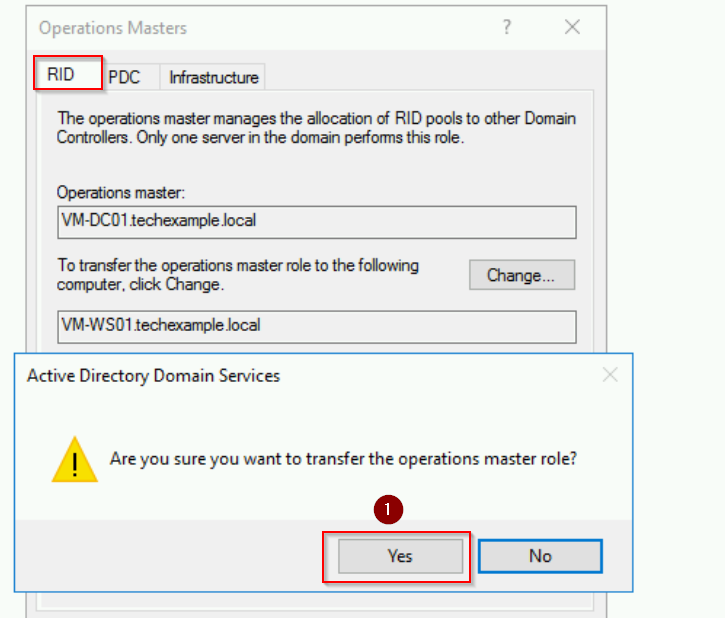
- Now, click Change and configure the transfer when prompted.
Step 4: Transfer the PDC Emulator Role
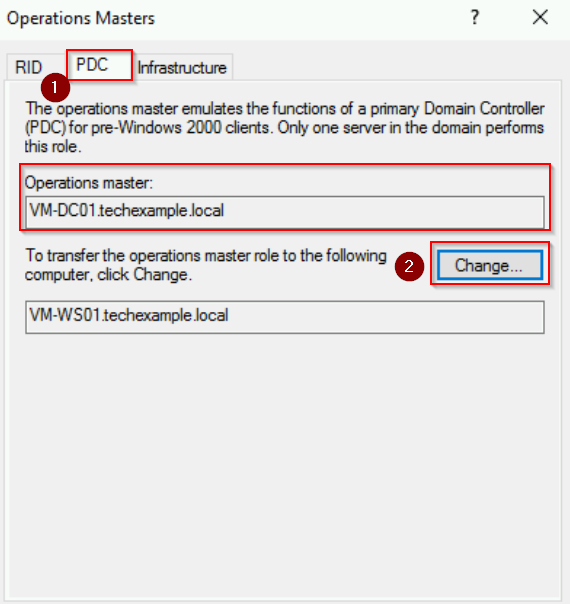
- Switch to the PDC tab in the same Operations Masters dialog.
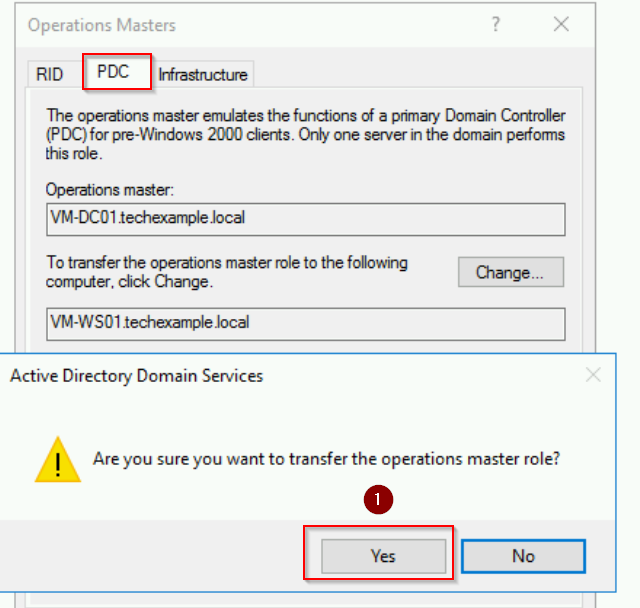
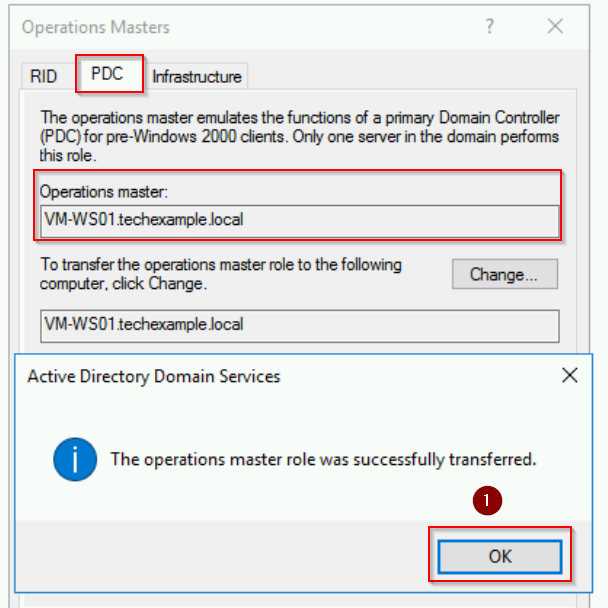
- Click Change, confirm the transfer, and acknowledge success.
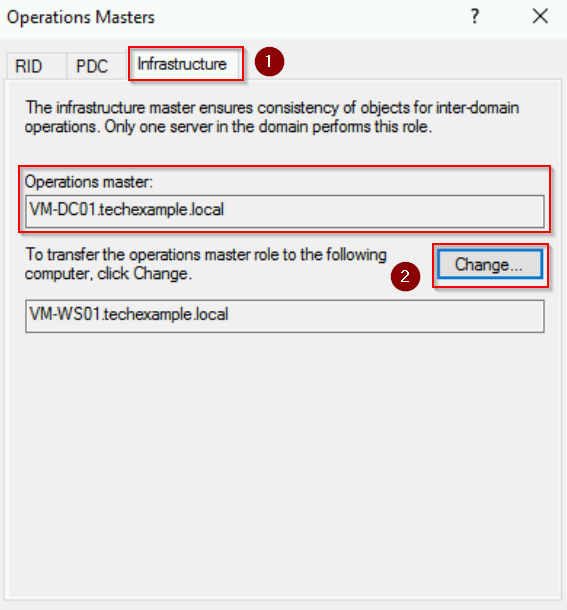
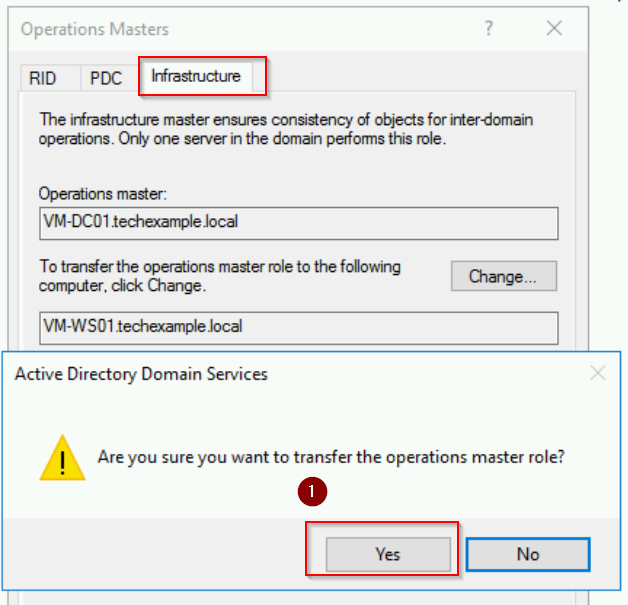
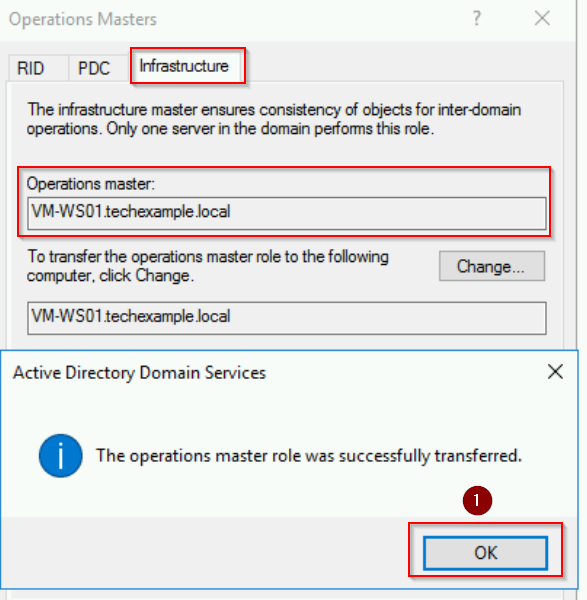
Step 5: Transfer the Infrastructure Master Role
- Move the Infrastructure tab in the Operations Masters dialog.
- Repeat the same process: Click Change, confirm, and acknowledge success.
Close the Operations Masters dialog once all three roles are transferred.
PowerShell Method
On server WS01, open PowerShell as Administrator. Next, run the following commands to transfer each role:
# Obtain the FQDN of the server
$serverFQDN = [System.Net.Dns]::GetHostByName($env:computerName).HostName

# Obtain hostname
$serverName = hostname

# Transfer RID Master
Move-ADDirectoryServerOperationMasterRole -Identity $serverName -OperationMasterRole RIDMaster

# Transfer PDC Emulator
Move-ADDirectoryServerOperationMasterRole -Identity $serverName -OperationMasterRole PDCEmulator

# Transfer Infrastructure Master
Move-ADDirectoryServerOperationMasterRole -Identity $serverName -OperationMasterRole InfrastructureMaster
Next, use the following command to verify the current role holders:
Get-ADDomain | Select-Object RIDMaster, PDCEmulator, InfrastructureMaster
Transferring Forest-Wide FSMO Roles
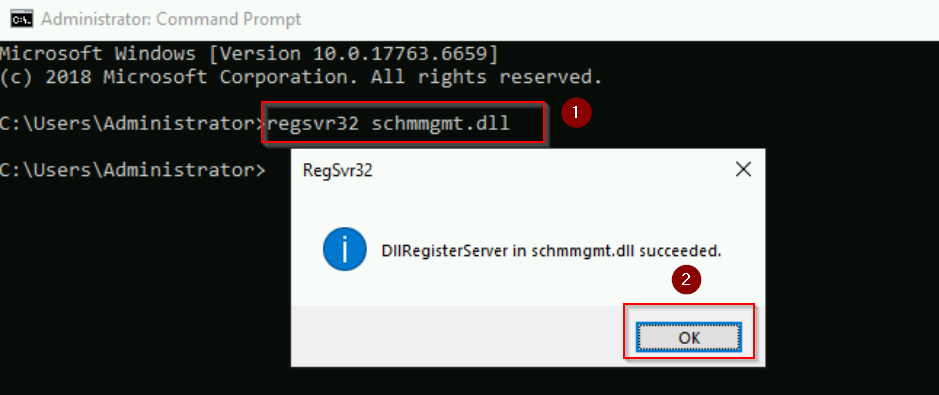
Step 1: Register the Schema Admin DLL
- On WS01 server, open Command Prompt, type regsvr32 schmmgmt.dll and press Enter.
- Click OK when the registration is successful.
Step 2: Access Active Directory Schema
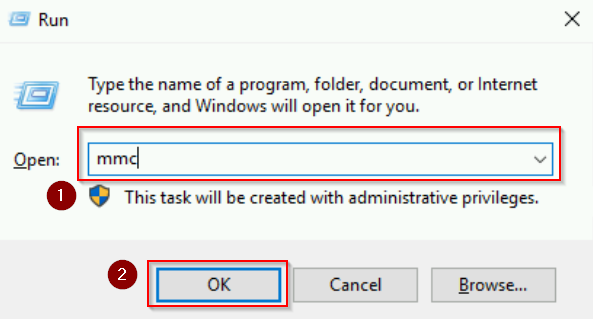
- Open Run, type
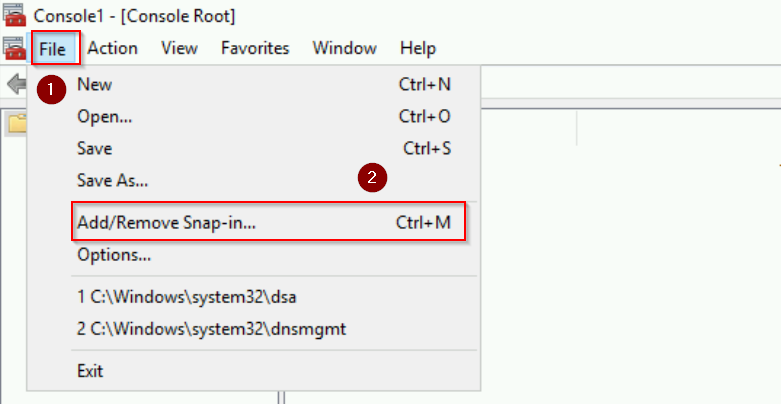
mmc, and press Enter to open the Microsoft Management Console. - Go to File > Add/Remove Snap-in…
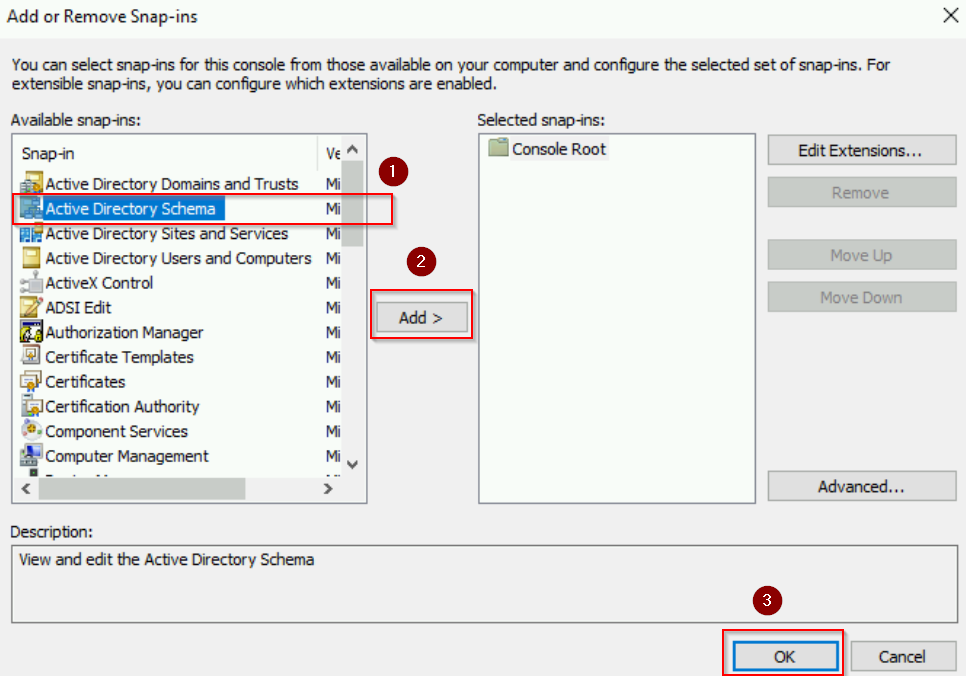
- Select Active Directory Schema from the list and click Add, then click OK.
Step 3: Change the Schema Master Role
- Expand Active Directory Schema in the MMC console.
- Right-click Active Directory Schema and select Change Active Directory Domain Controller.
- Choose WS01 and click OK.
- Right-click Active Directory Schema and select Operations Master.
- Click Change, confirm the transfer, and acknowledge success.
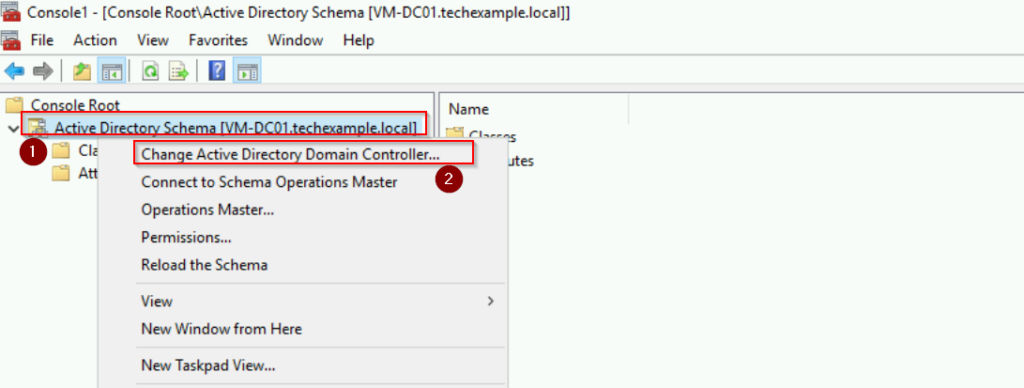
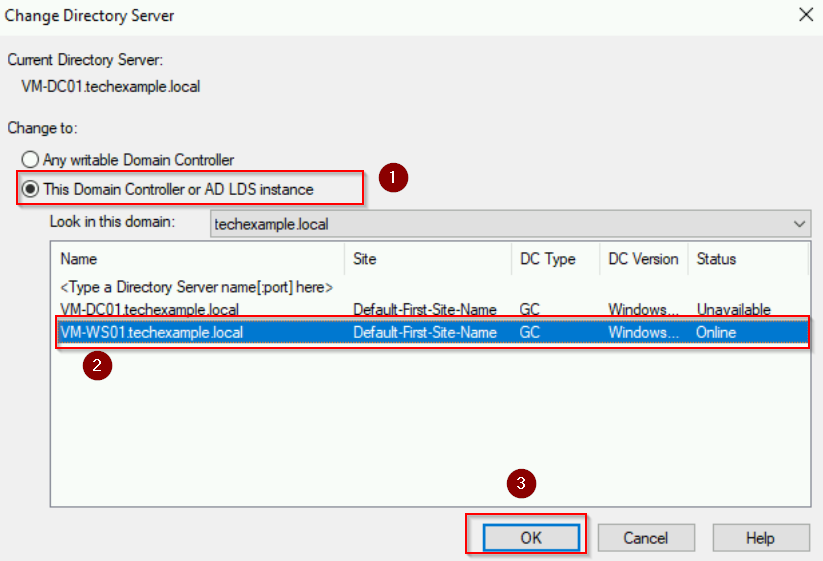
Notice that the Active Directory Schema is now connected to [VM-WS01.techexample.local] server.

- Right-click on Active Directory Schema and select Operations Master.
- In the Change Schema Master dialog box, click Change. Click Yes to proceed in the message box.
- Click OK to acknowledge that the role transfer was successfully completed.
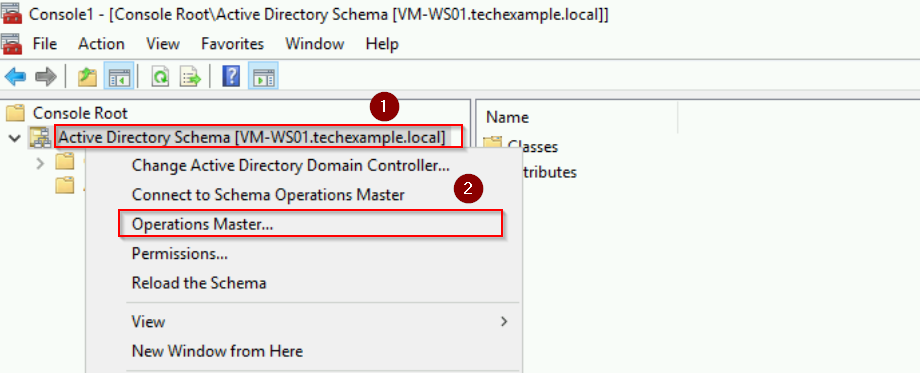
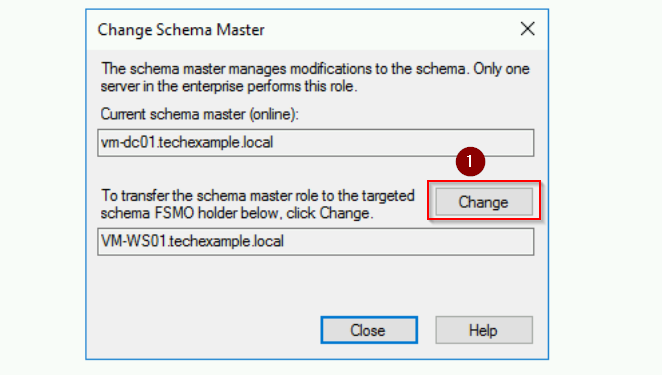
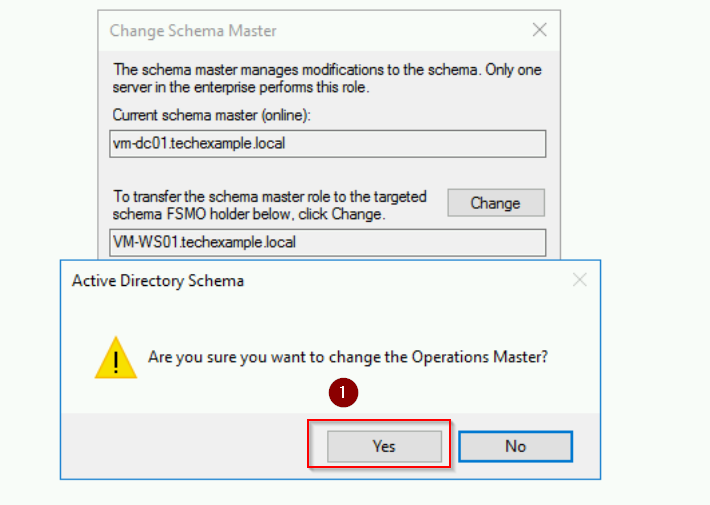
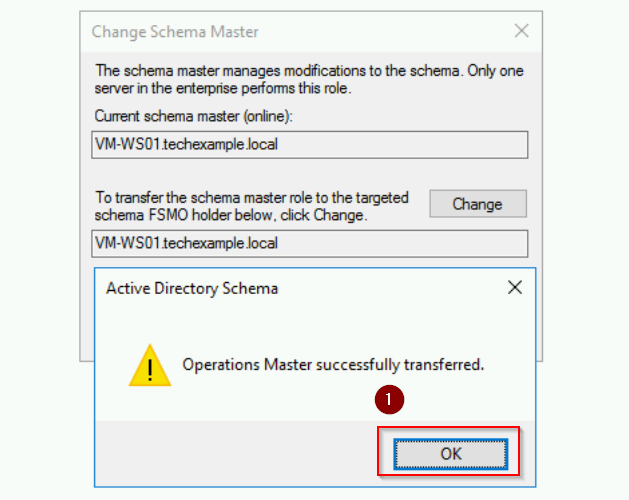
The Schema Master role has now been transferred to VM-WS01 server.
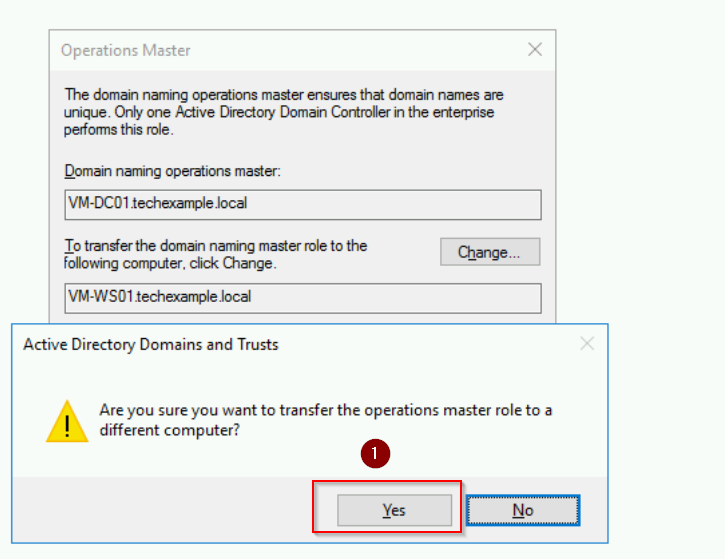
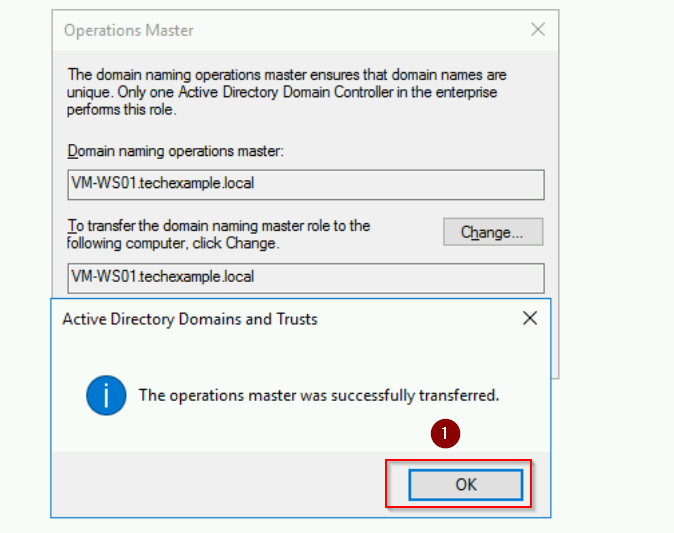
Step 4: Transfer the Domain Naming Master Role
- We are still on the WS01 server. Open Server Manager > Tools > Active Directory Domains and Trusts.
- Right-click Active Directory Domains and Trusts [VM-WS01.techexample.local] and select Operations Master.
- Click Change, confirm, and acknowledge the successful transfer.
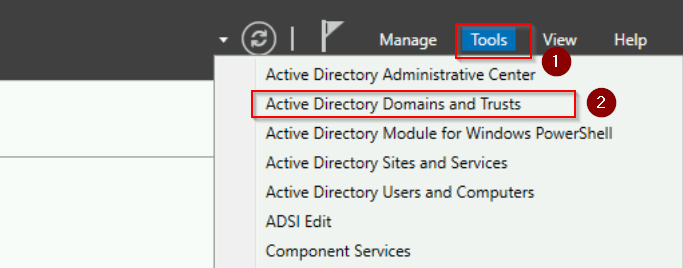
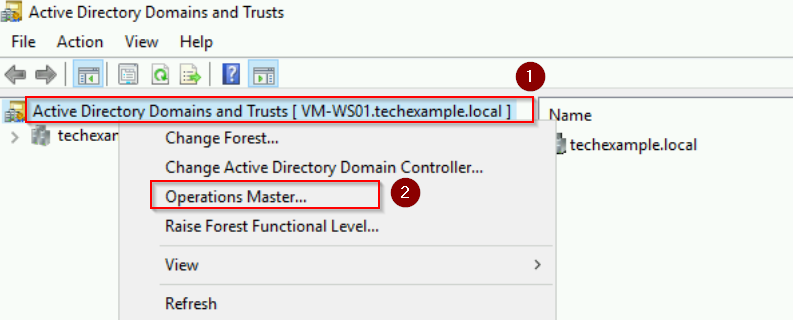
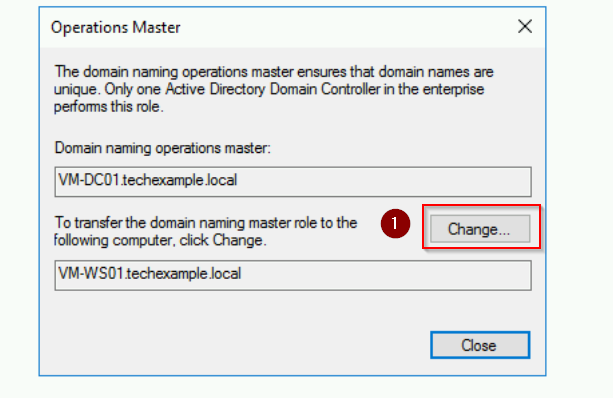
PowerShell Method
Transfer the Schema Master role:
# Obtain the hostname
$serverName = hostname

# Transfer Schema Master role
Move-ADDirectoryServerOperationMasterRole -Identity $serverName -OperationMasterRole SchemaMaster
Transfer Domain Naming Master role:
# Obtain the hostname
$serverName = hostname

Move-ADDirectoryServerOperationMasterRole -Identity $serverName -OperationMasterRole DomainNamingMaster
Verify the Forest-Wide FSMO roles:
Get-ADForest | Select-Object SchemaMaster, DomainNamingMaster
Demote the old Domain Controller (Optional)
One thing to note is that if you are demoting a domain controller after transferring roles, be sure to clean up DNS records and perform metadata cleanup using tools like ntdsutil to remove any lingering references. Here is how:
Using Server Manager to demote DC
- On DC01 server, open Server Manager and click on Manage > Remove Roles and Features.
- In the Remove Roles and Features Wizard, click Next until you reach the Server Roles page.
- Uncheck the Active Directory Domain Services role.
- You will see a prompt indicating that the server is a domain controller and must be demoted first. Click Demote this domain controller.
- In the Active Directory Domain Services Configuration Wizard:
- Do not select the Force the removal of this domain controller checkbox unless necessary.
- Provide the credentials of a Domain Administrator.
- Click Next and confirm the demotion.
- Once the demotion completes, the server will automatically restart and become a standalone server.
Using PowerShell to demote DC
Remove Active Directory Domain Services Role:
Uninstall-ADDSDomainController -DemoteOperationMasterRole -ForceRemoval -Credential (Get-Credential)
- -DemoteOperationMasterRole: Demotes the DC even if it holds FSMO roles. Since FSMO roles are already transferred, this ensures no errors occur.
- -ForceRemoval: Forces the demotion process.
Enter the Domain Administrator credentials when prompted. After that, confirm the demotion when PowerShell asks for confirmation.
After the demotion is complete, the server will reboot automatically and function as a standalone server.
Cleaning up Metadata and DNS Records
Ensure there are no lingering references to the old DC using:
ntdsutil metadata cleanup
Also, remove any old DNS records for the demoted DC. Moreover, make sure that the demoted server no longer appears in the list of domain controllers.
Verification and Consideration
To verify the transfer, we use the Netdom Query FSMO command in PowerShell to list the current FSMO role holders.
netdom query fsmo
Ensure all roles have been assigned to the WS01 domain controller.
Finally, to ensure proper replication between the domain controllers:
repadmin /replsummary
repadmin /showrepl
Conclusion
In a nutshell, transferring FSMO roles is a straightforward yet critical task when upgrading or transitioning domain controllers. By following these steps, you can ensure your Active Directory environment remains stable and functional. Always remember to verify the transfer and maintain backups of your system to prevent data loss.
