Introduction
In the Windows Server environment, Active Directory (AD) plays a vital role in managing users, computers, and resources. In this blog, we will explore key concepts such as forests, domain controllers, and why adding redundancy in your AD setup is critical. We’ll conclude with a hands-on lab to create a new AD Forest and install an additional domain controller.
What is an Active Directory Forest?
Active Directory Forest is the highest level of organization within the AD structure. It include all of the domains, users, computers, groups, and resources within the network. Typically, one AD forest is sufficient for a large company to organize its network assets into a single directory service, simplifying management and security.
If we have many AD forest, each AD forest is isolated from other forests, and objects in one forest are not automatically visible or accessible to another forest unless trust relationships are established.
Key components of an AD forest include:
- Schema Naming Context (NC): Defines all object types (e.g., users, computers) and their attributes (e.g., usernames, email addresses). There is only one schema per forest.
- Configuration Naming Context: Stores information about network services and site (locations). This partition is unique to the forest and applies to all domains within it.
- Domain Naming Context: Contains the actual objects within each domain (such as users, computers, groups, organizational unit). There can be multiple domain partitions in a forest.
Organizations may create a new AD forest for various reasons, such as:
- Security Isolation: Each forest acts as a security boundary, and creating a new forest ensures that resources remain isolated from other forests unless explicitly shared.
- Independent Management: Different divisions or subsidiaries within a company may require their own forest to manage resources independently.
- Geographic/Organizational Structure: Some organizations set up multiple forests to reflect distinct operational boundaries, such as different regions or departments.
What is a Forest Root Domain?
The Forest Root Domain is the first domain created when a new AD forest is built. It is the foundation of the AD structure, defining the administrative boundaries for an organization’s network. From this root domain, additional domains can be added over time, building out the larger AD forest.
When you create a new AD forest, the process starts with establishing the Forest Root Domain. This root domain is essential because it becomes the administrative hub for all future domains and objects within the forest.
Active Directory Domain Services (AD DS)
AD DS is a Windows Server role that provides directory services to manage network object such as users, groups, computers, subnets, and sites. Without AD DS, you cannot create domains or manage directory objects.
When AD DS is installed, the server becomes a Domain Controller (DC), responsible for maintaining the Active Directory (AD) database.
Role of a Domain Controller
A Domain Controller (DC) is a server that runs AD DS and authenticates users and devices within a domain. It stores a copy of the Active Directory database, containing information about all users, computers, and security groups in that domain.
The key functions of a domain controller include:
- Authentication: Ensuring users and computers can access resources.
- Authorization: Managing permissions to resources based on policies.
- Replication: Sharing changes across other DCs to maintain consistency.
Additional Domain Controller
In larger or more critical environments, having an additional domain controller is essential for the following reasons:
- Performance: By distributing authentication and request processing across multiple DCs, the overall network performance improves.
- Redundancy: If one domain controller fails, others can take over to ensure high availability, preventing a single point of failure.
- Database Recovery: Each domain controller holds a writable copy of the Active Directory database, so having multiple DCs ensures better data integrity and faster recoverability in case of a failure.
Lab: Creating a New AD Forest and Install an Additional Domain Controller
Now that we’ve covered the theoretical aspects, let’s move on to the practical side. In this section, we will guide you through creating a new AD forest and adding an additional domain controller in a Windows Server environment using both GUI and PowerShell methods.
Lab Topology
Here is the requirements for this lab (example.local):
| Device | IP Address | Default Gateway | Preferred DNS | Alternate DNS |
| Server 1 (Primary DC) | 192.168.1.100 | 192.168.1.254 | 127.0.0.1 (Loopback Address) | 192.168.1.101 (Secondary DC’s IP) |
| Server 2 (Additional DC) | 192.168.1.101 | 192.168.1.254 | 127.0.0.1 (Loopback Address) | 192.168.1.100 (Primary DC’s IP) |
Secondly, for lab testing, using .local is recommended to keep it isolated and avoid unintentional DNS conflict.
However, for production, you should use a registered domain name that aligns with your organization’s actual domain. Reason include:
- Future Proofing: Allows integration with public services (e.g., Azure AD, Office 365) without requiring domain reconfiguration.
- Security and Consistency: Using the real domain ensures consistent naming and better alignment with external DNS configurations.
Recommended DNS Configuration
Primary DC (192.168.1.100)
- Preferred DNS Server: 127.0.0.1 (Loopback Address)
- The primary DC should refer to itself first to resolve DNS queries, ensuring it can handle local lookups efficiently and operate independently if the network or secondary DC is temporarily unavailable.
- Alternate DNS Server: 192.168.1.101 (Secondary DC’s IP)
- Use the secondary DC as a fallback in case of issues with the primary server’s DNS service.
Secondary DC (192.168.1.101)
- Preferred DNS Server: 127.0.0.1 (Loopback Address)
- Similarly, the secondary DC should prioritize itself for DNS queries.
- Alternate DNS Server: 192.168.1.100 (Primary DC’s IP)
- The primary DC acts as a backup if the secondary DC’s DNS service encounters issues.
Setting Up a New AD Forest
GUI Method
Step 1: Install Active Directory Domain Services (AD DS)
In Server 1 (Primary Domain Controller), follow these steps:
- Open Server Manager on your Windows Server.
- Click Manage > Add Roles and Features.
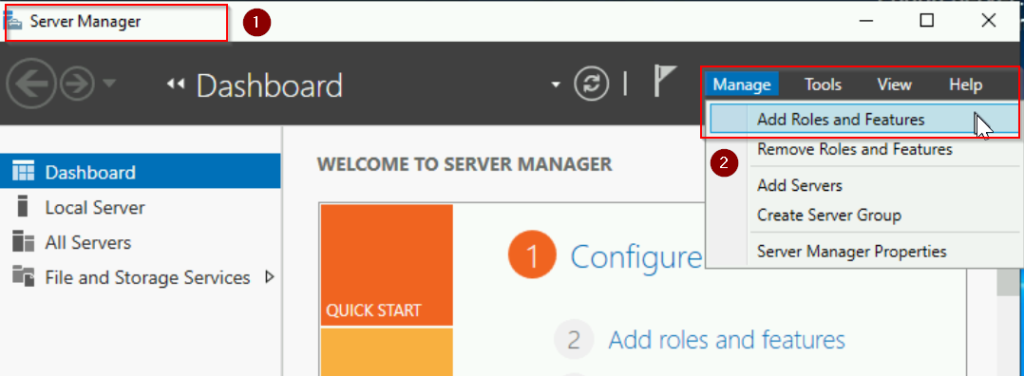
In the Add Roles and Features Wizard:
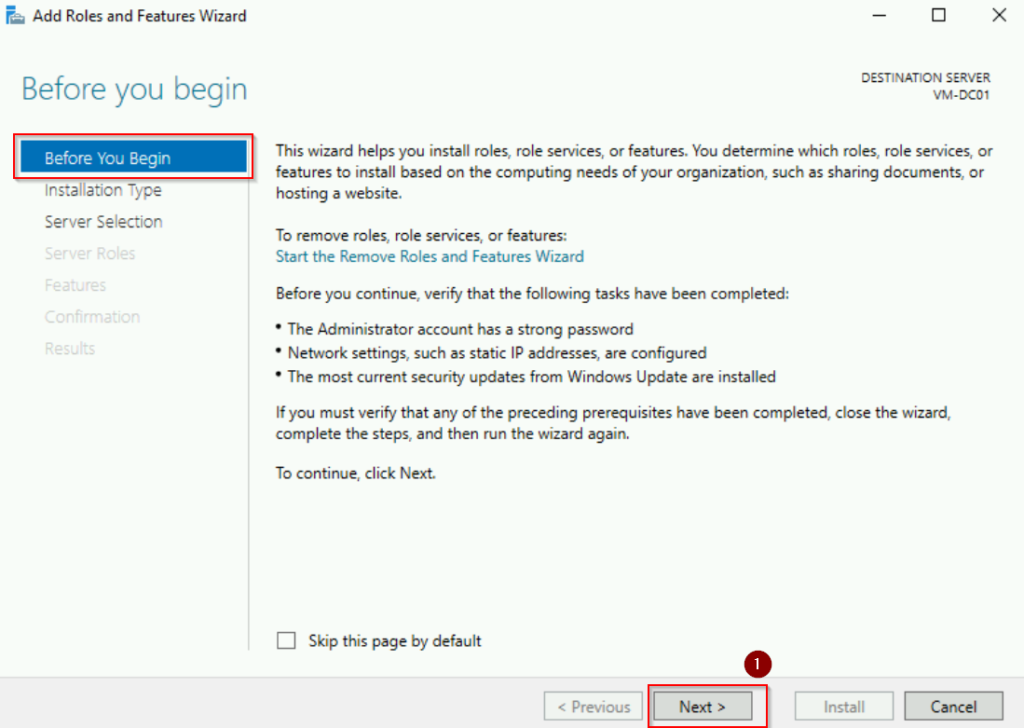
- Click Next on the Before you begin page.
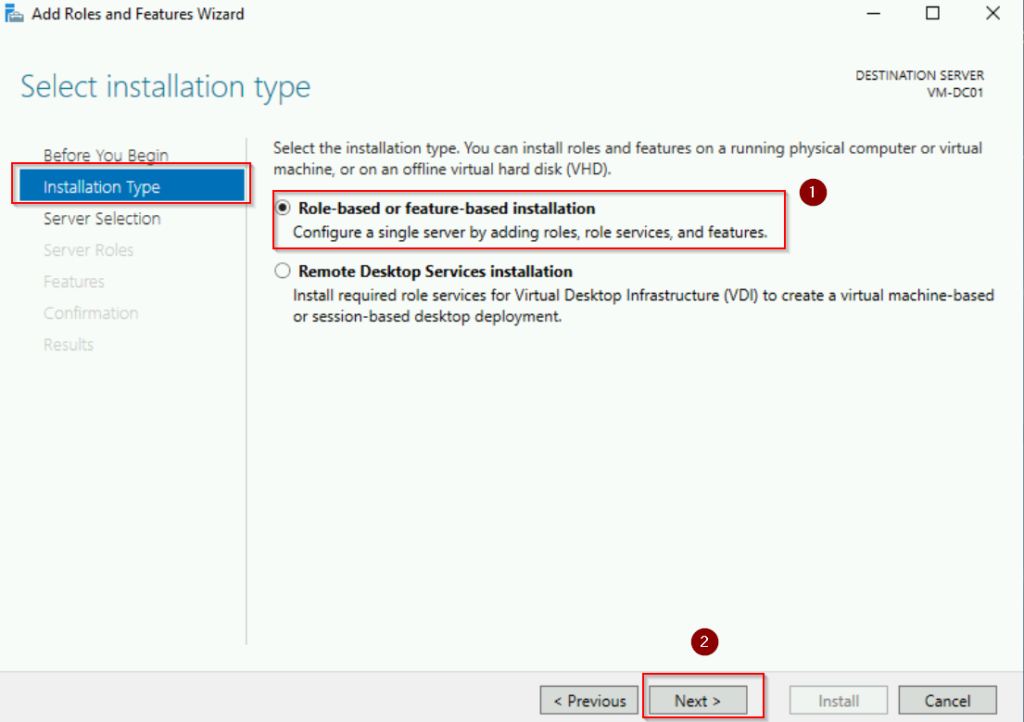
- Choose Role-based or feature-based installation and click Next.
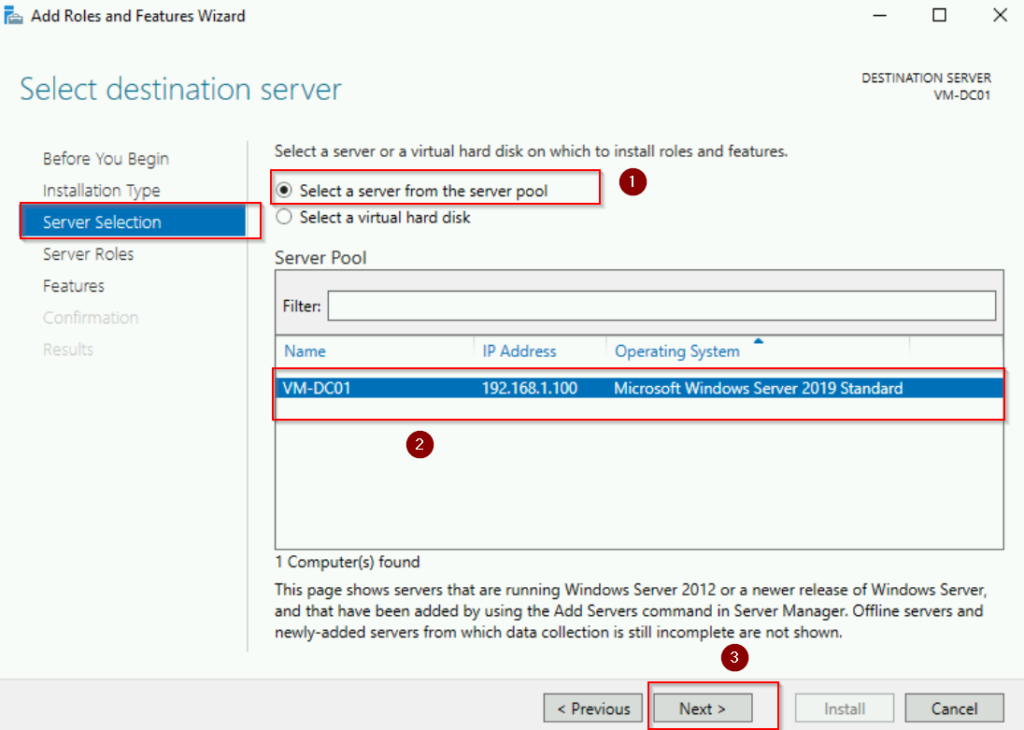
- Select the local server from the server pool and click Next. In this case, our server named VM-DC01.
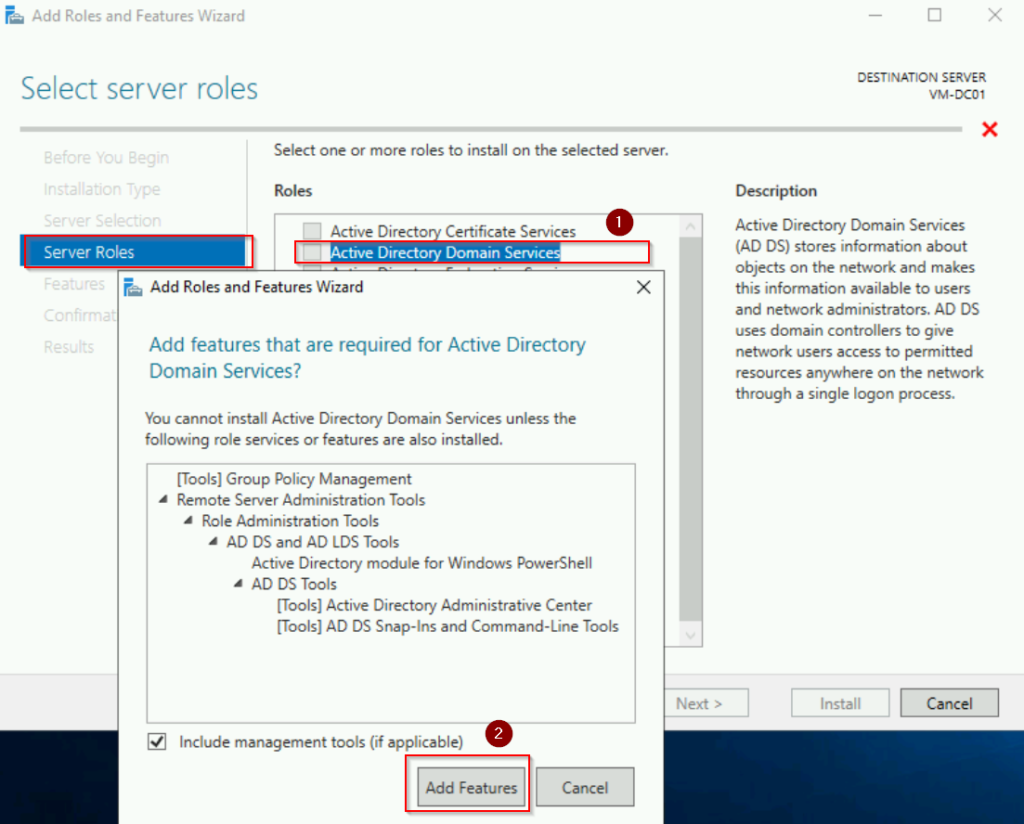
- On the Server Roles page, check Active Directory Domain Services, then click Add Features when prompted. Click Next.
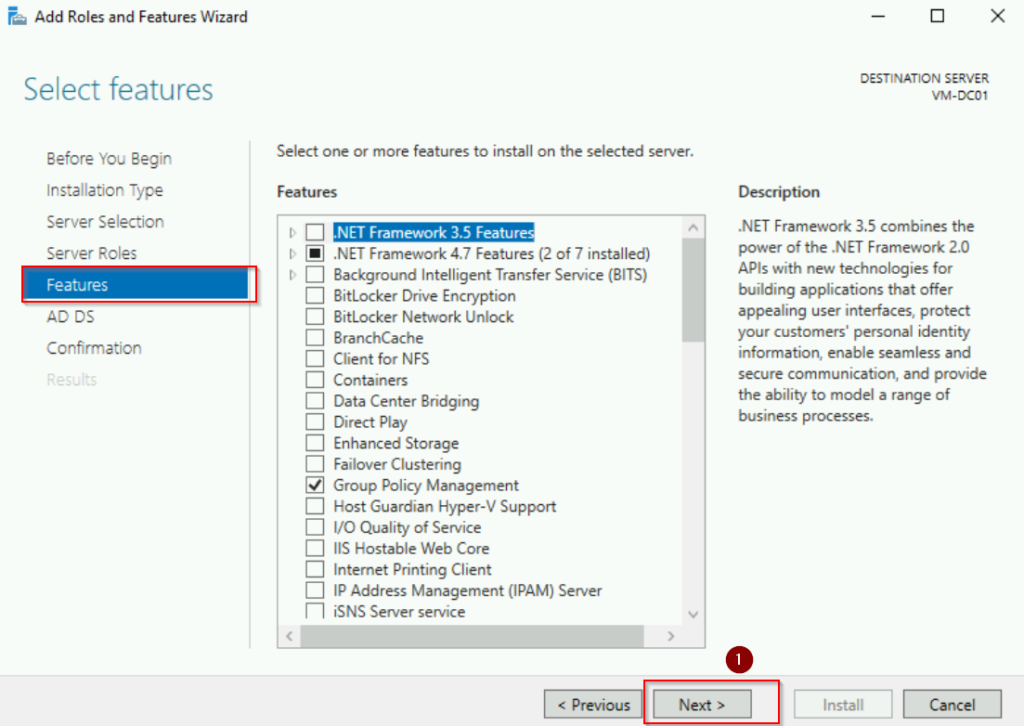
- Keep default selections for features and click Next.
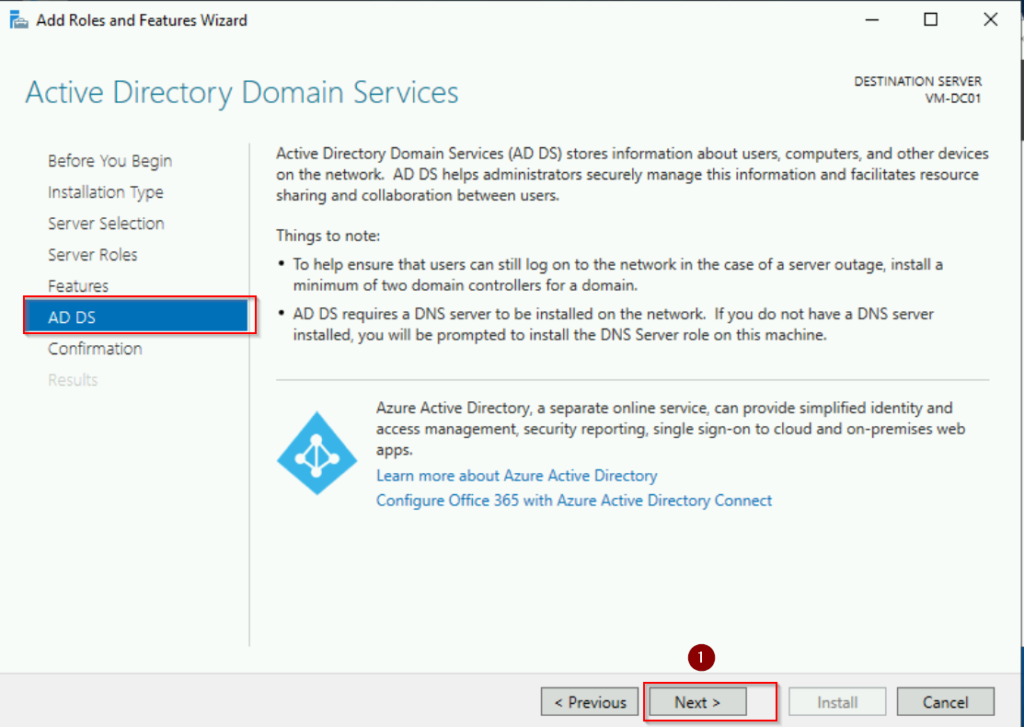
- Review the information on the AD DS page and click Next.
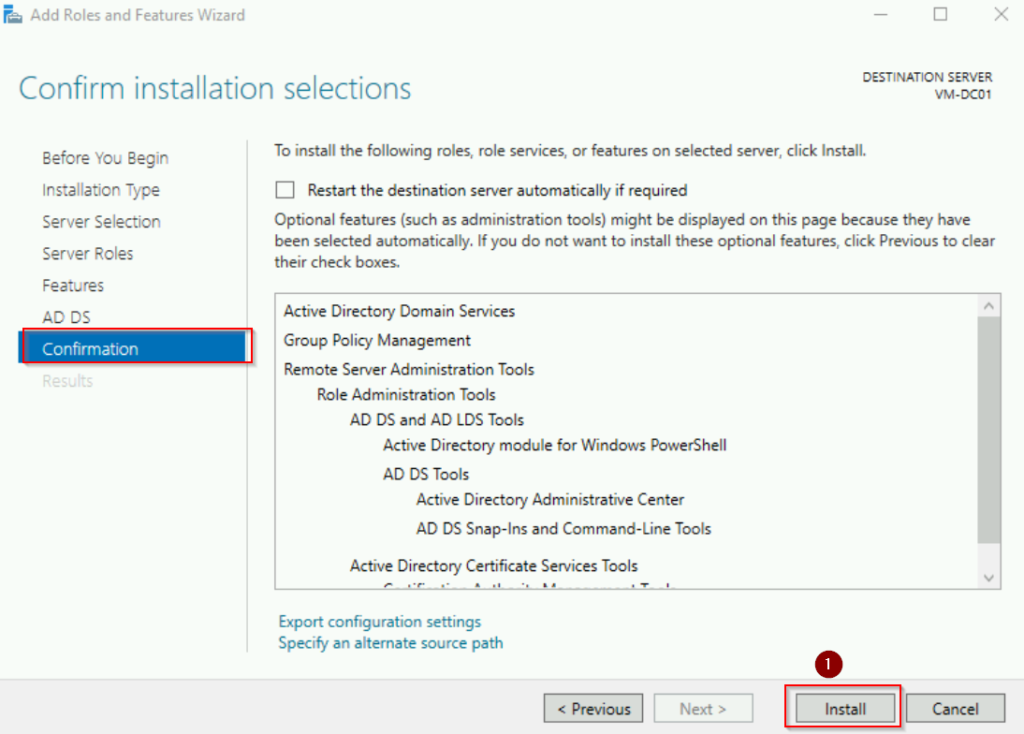
- Click Install on the confirmation page.
- See screenshots below:
Step 2: Promote your server to a domain controller
We are still in Server 1. After the AD DS installation, it doesn’t make the server a domain controller yet, it merely adds the required components. Click the Promote this server to a domain controller link in the notification area of Server Manager.

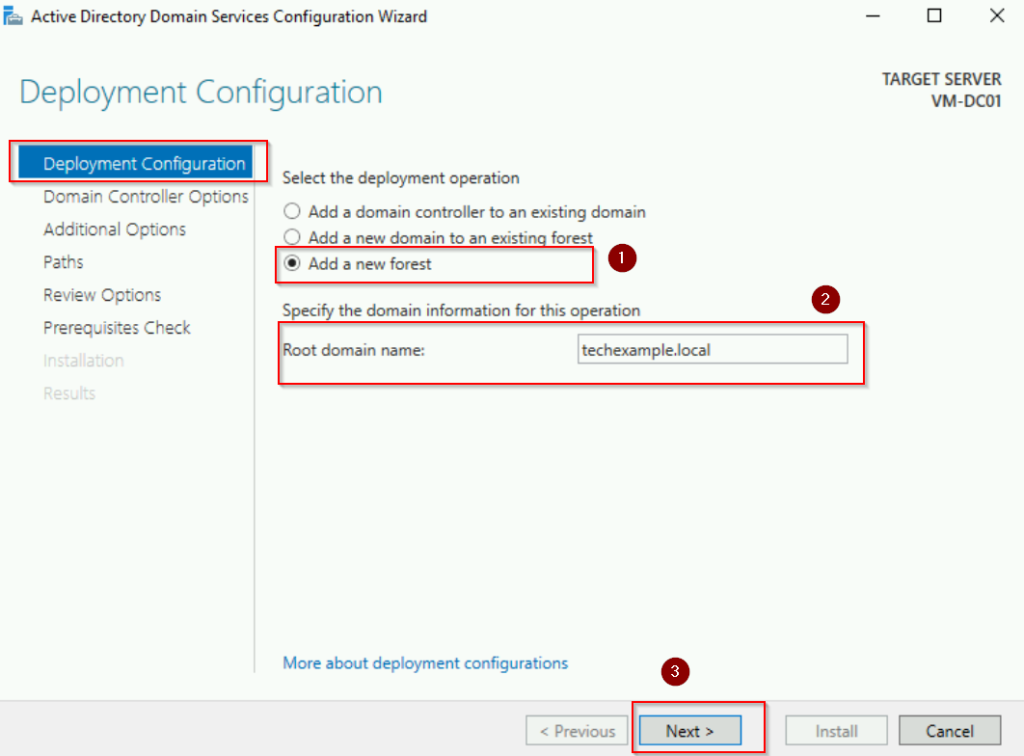
In the Deployment Configuration window:
- Choose Add a new forest. This will establish a new independent AD environment, the root of all domains in the organization.
- Enter techexample.local as the Root domain name and click Next. This domain name aligns with our lab environment.
- See screenshot below:
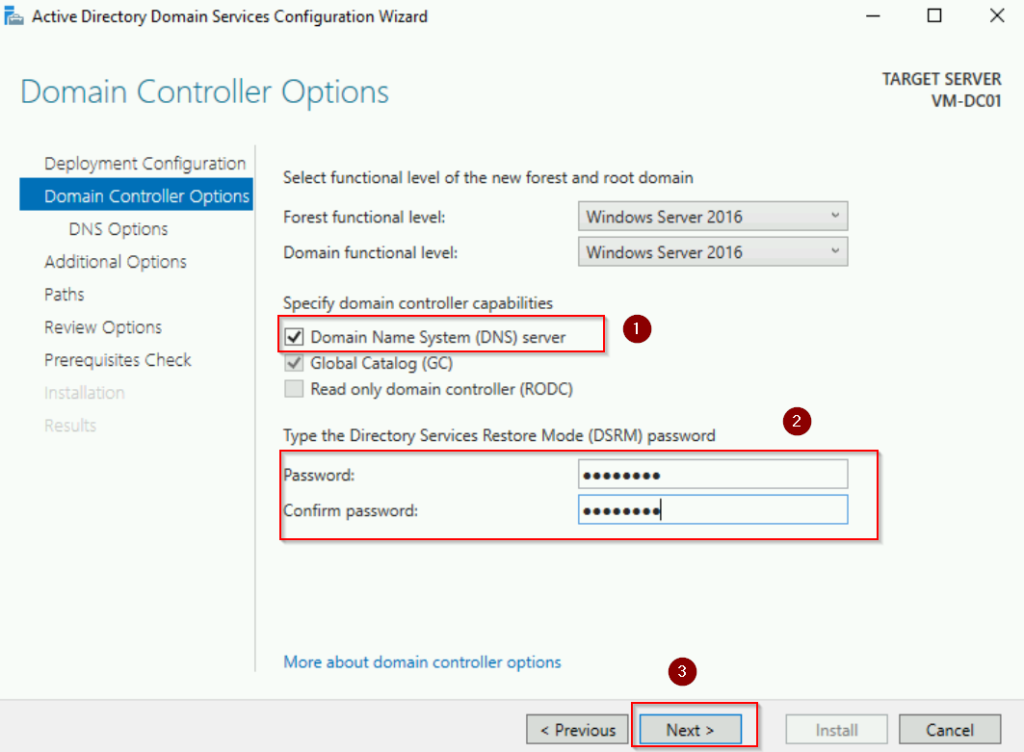
In the Domain Controller Options window:
- Verify that Domain Name System (DNS) server is selected (it is enabled by default). Active Directory heavily relies on DNS for name resolution and locating domain controllers.
- Enter a Directory Services Restore Mode (DSRM) password, then click Next. The DSRM password is used for recovering or repairing AD in case of failures.
- See screenshot below:
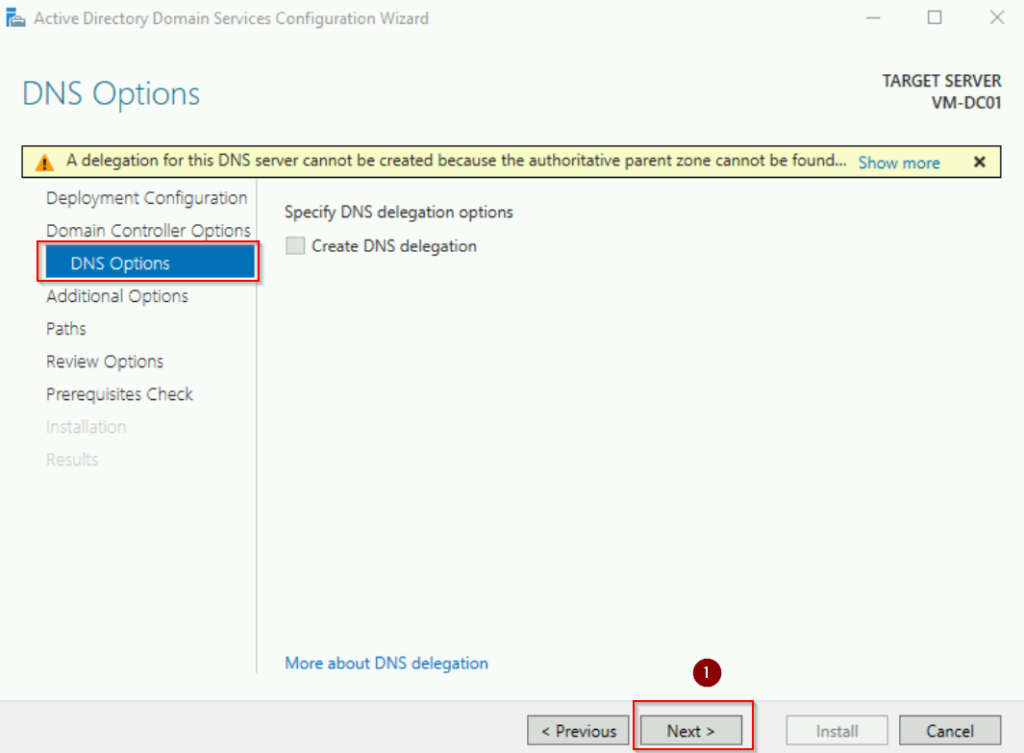
Leave default settings for DNS Options, and click Next. Adjusting these settings is only necessary for advanced or hybrid configurations.
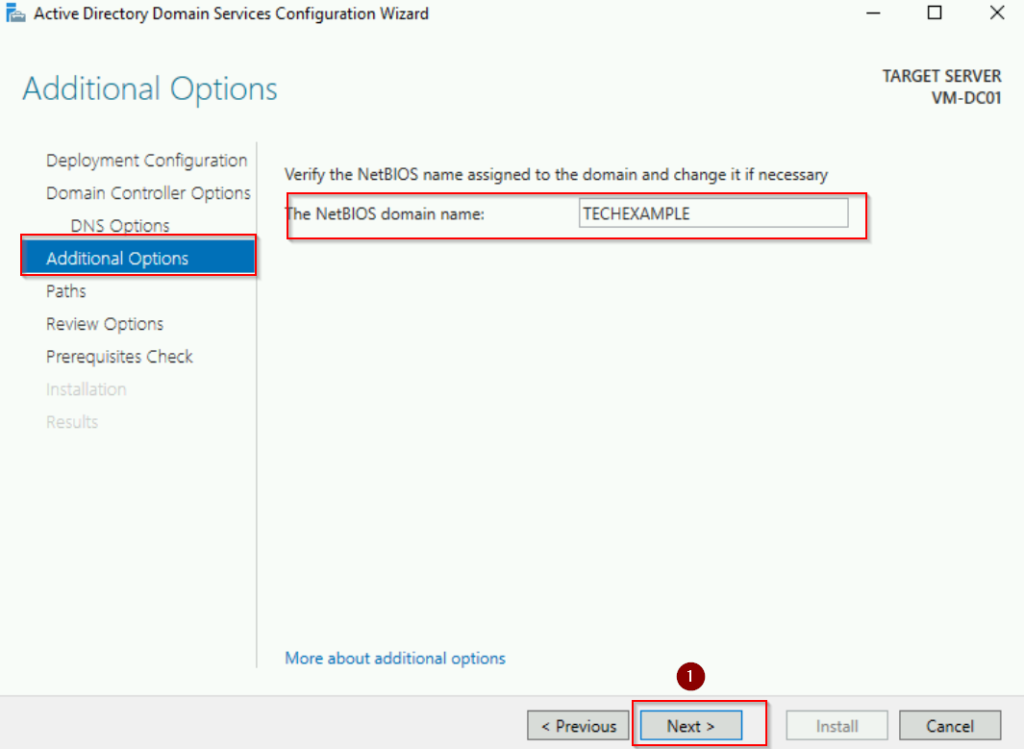
On the Additional Options page, verify the NetBIOS domain name (e.g., TECHEXAMPLE) and click Next. NetBIOS domain name is a short, legacy-compatible version of the domain name. It is used in environments or applications that rely on NetBIOS.
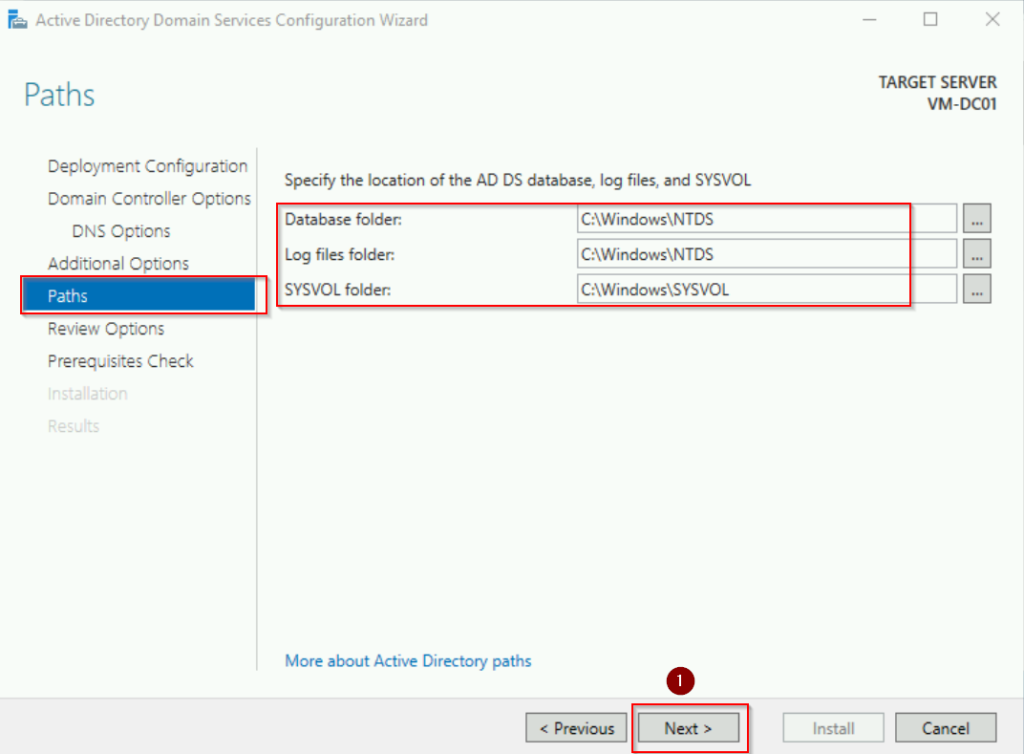
Accept default paths for the database, log files, and SYSVOL folder, then click Next. These folder store critical AD data:
- Database (NTDS.dit): Contains the Active Directory database.
- Log files: Track changes to the database.
- SYSVOL folder: Holds shared files like group policy and logon scripts.
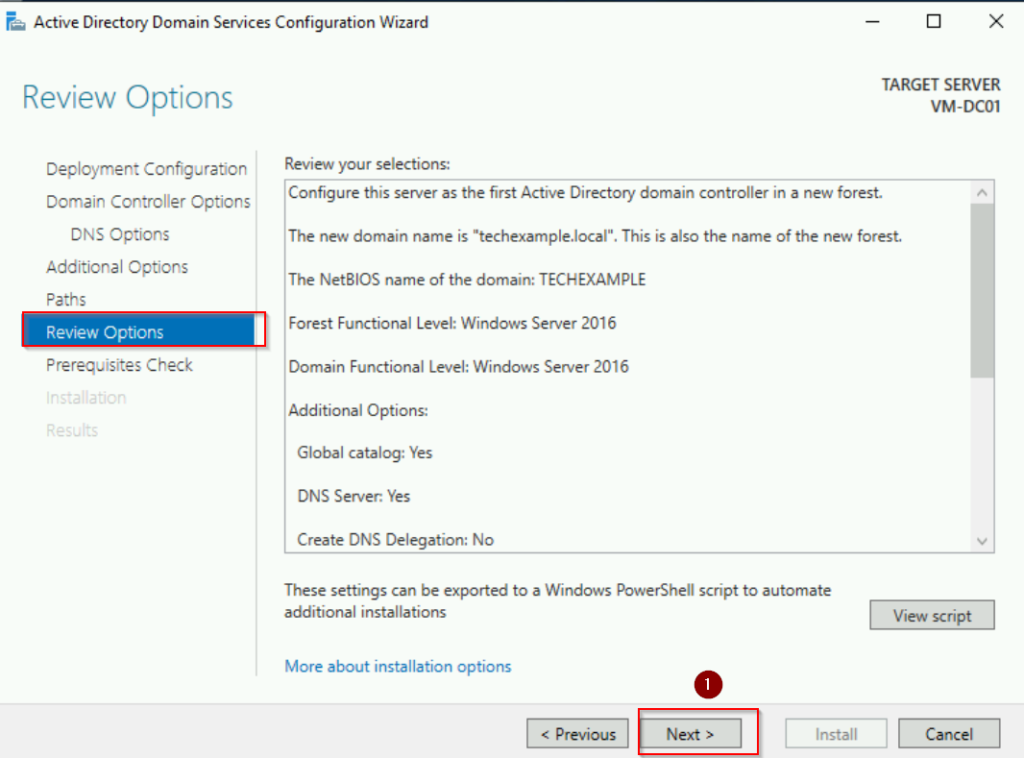
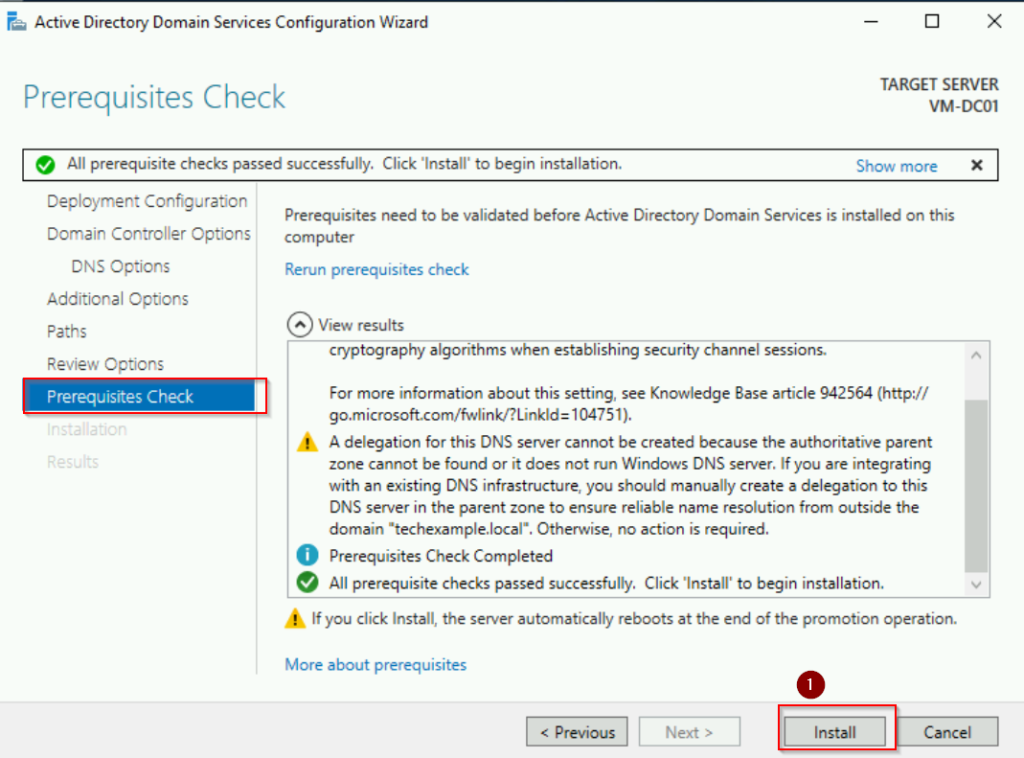
Review the configuration and click Install. The server will automatically reboot after the installation.
Step 3: Verify the Installation
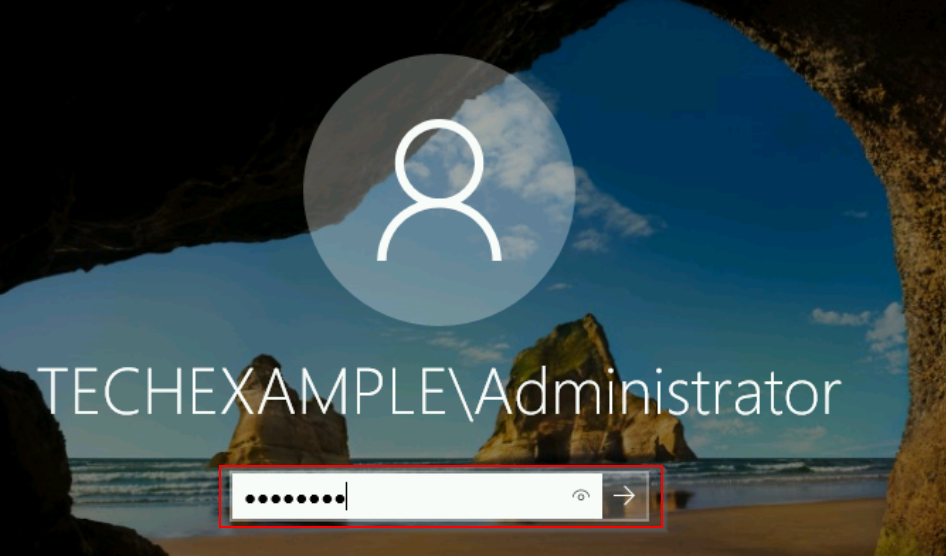
Once the server reboots, log in using the domain administrator account.
Open Server Manager and ensure the Active Directory Users and Computers console is available under Tools.

Verify the domain by opening a PowerShell window and running the following command:
Get-ADDomain
The output should display information about the techexample.local domain.

Step 4: Verify DNS Resolution
Check Forward and Reverse Lookup
From the Domain Controller (VM-DC01), open PowerShell and type this command to test forward lookup (resolving domain name to IP):
nslookup techexample.local
The result should show the IP address of your domain controller, in this case is 192.168.1.100

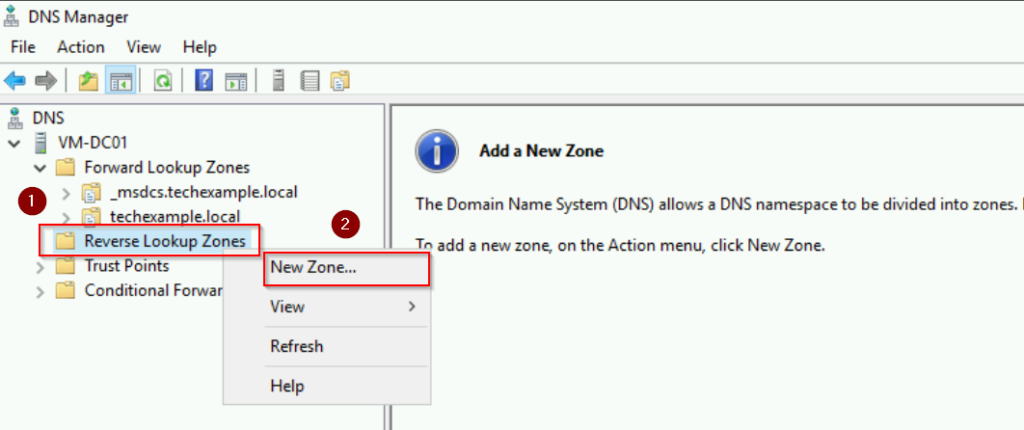
Next, we test the reverse lookup (resolving IP to domain name). Reverse lookups are particularly useful for troubleshooting and logging. First, we need to go to DNS manager to configure the reverse DNS zone:
- Go to Server Manager > Tools > DNS
- Right-click Reverse Lookup Zones and select New Zone
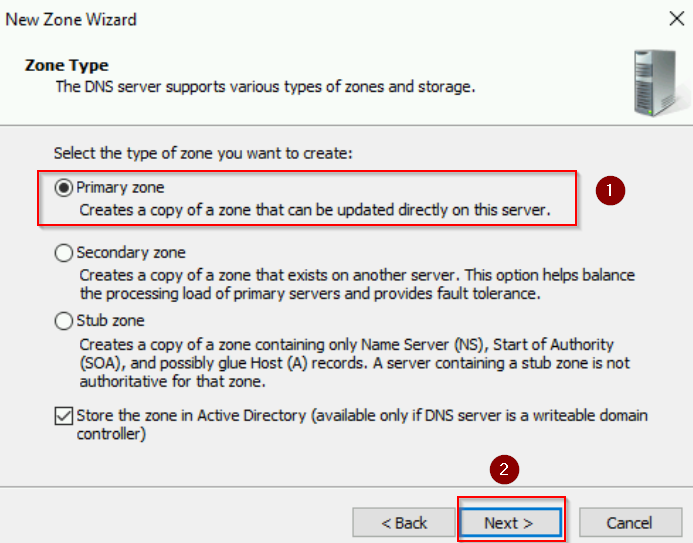
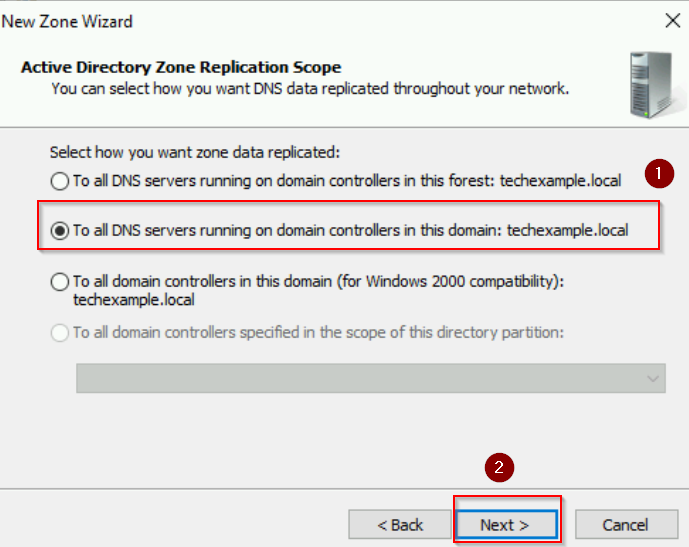
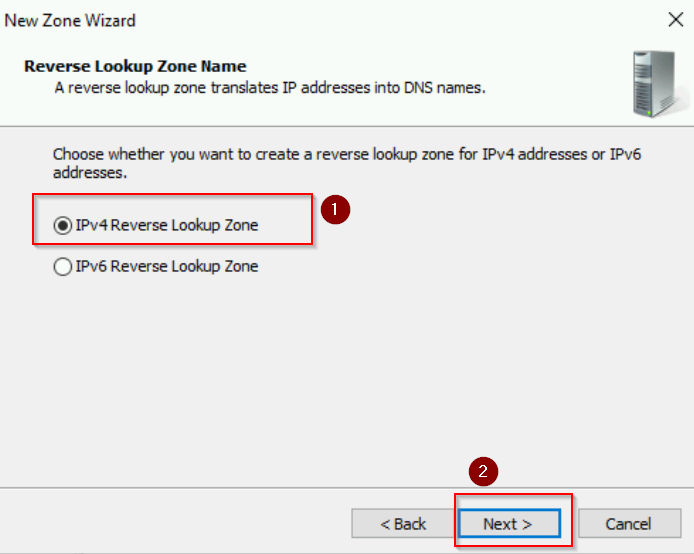
- Follow the New Zone Wizard:
- Zone Type: Choose Primary zone.
- Replication Scope: Keep the default (to all DNS servers in the forest or domain).
- Network ID: Enter 192.168.1 (the first three octets of your IP address).
- Dynamic Updates: Allow Secure Dynamic Updates.

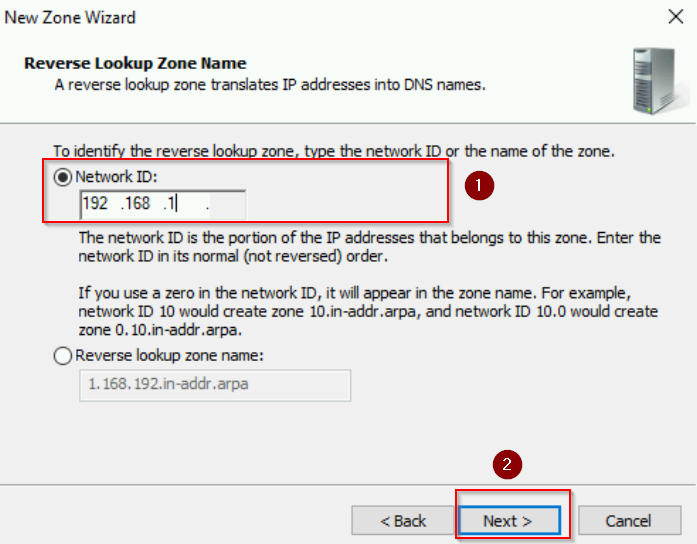

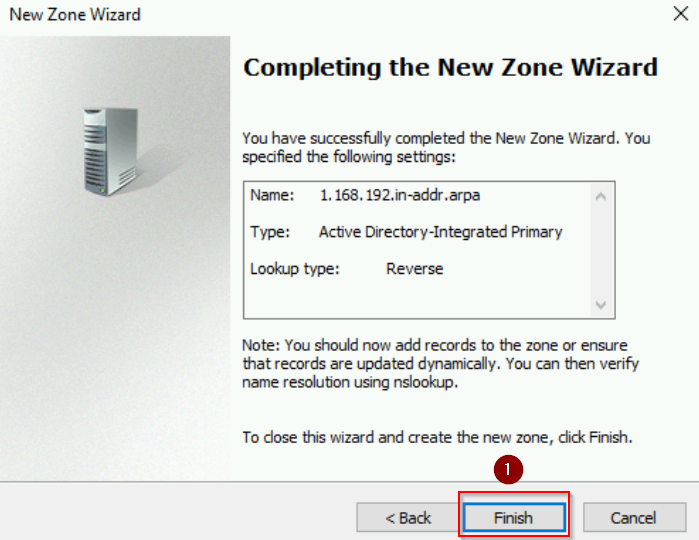
- Next, add a Pointer (PTR) record for your domain controller.
- Right-click the new reverse lookup zone.
- Select New Pointer (PTR).
- Enter IP address and Host name, click OK.
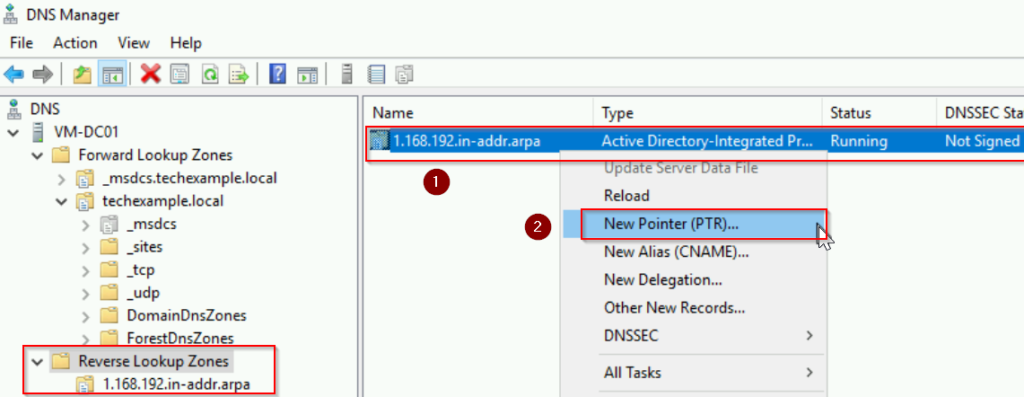
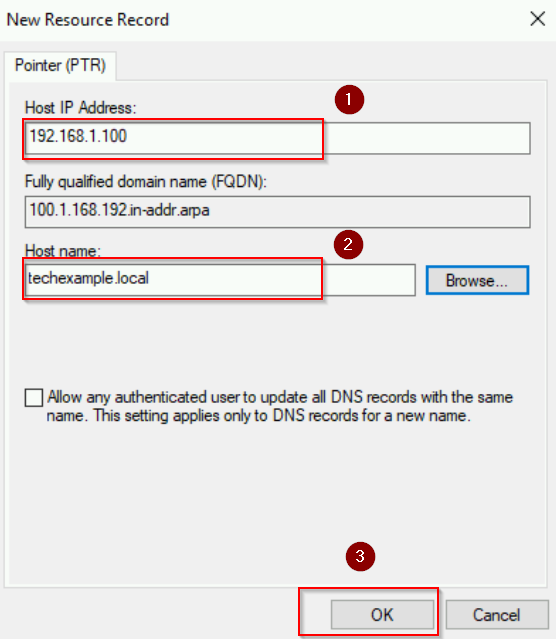
Now, we can test the reverse lookup:
nslookup 192.168.1.100
The result now display the hostname techexample.local

Test DNS Service Health:
Run the following command on the domain controller, pay attention to any warnings or errors, as they may highlight configuration issues:
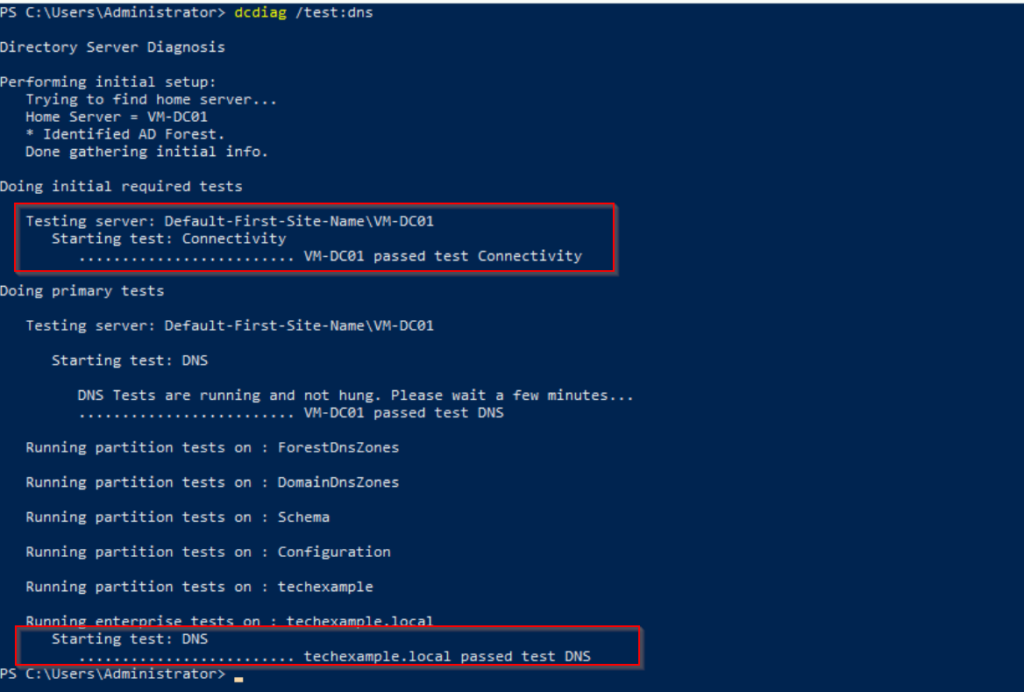
dcdiag /test:dns
As you can see from the screenshot below, techexample.local have passed test DNS.
PowerShell Method
Step 1: Disable DHCP and configure Server IP Address
An Active Directory server should always have a static IP address to ensure reliable connectivity. Second, if the server is intended to function with a fixed IP address, DHCP should be disabled on that specific NIC.
On Server 1 (VM-DC01), begin disable DHCP for the specific NIC, and set IP:
# Get the network adapter name
$AdapterName = Get-NetAdapter | Where-Object {$_.Status -eq "Up"} | Select-Object -ExpandProperty Name

# Disable DHCP
Set-NetIPAddress -InterfaceAlias $AdapterName -DHCP Disabled -PassThru

#Assign Ips to variables
$Ipaddress      = "192.168.1.100"
$Dnsaddress     = "127.0.0.1"
$Gatewayaddress = "192.168.1.254"

#Removing existing IP and Gateway
Remove-NetRoute -InterfaceAlias $AdapterName `
                -AddressFamily IPv4 `
                -Confirm:$false `
                -PassThru

Remove-NetIpAddress -InterfaceAlias $AdapterName `
                    -AddressFamily IPv4 `
                    -Confirm:$false `
                    -PassThru

# Assign static IP
New-NetIPAddress -InterfaceAlias $AdapterName `
                 -IPAddress $Ipaddress `
                 -AddressFamily IPv4 `
                 -PrefixLength 24 `
                 -DefaultGateway $Gatewayaddress

# Set DNS server addresses
Set-DnsClientServerAddress -InterfaceAlias $AdapterName -ServerAddresses $Dnsaddress
Verify the static IP address and DNS settings:
Get-NetIPAddress -InterfaceAlias $AdapterName
Get-DnsClientServerAddress -InterfaceAlias $AdapterName
Step 2: Install Active Directory Domain Services (AD DS)
Here is how you Install the AD DS role and other services:
Open PowerShell as an Administrator, run the following command to install the AD DS role
# Setting Roles and Features variable
$FeaturesToAdd = @('SNMP-Service', 'AD-Domain-Services')

# Install the Roles and Features listed above
Install-WindowsFeature -Name $FeaturesToAdd -IncludeAllSubFeature -IncludeManagementTools

# Setup SNMP Community
REG ADD "HKLM\System\ControlSet001\Services\SNMP\Parameters\ValidCommunities" /v "public" /t REG_DWORD /d 4 /f
- HKLM: Stands for HKEY_LOCAL_MACHINE, a registry hive that stores settings for the local machine.
- ControlSet001\Services\SNMP\Parameters\ValidCommunities: Specifies the location where SNMP community settings are stored.
- /v “public”
- /t REG_DWORD: Specifies the type of the registry value to be added.
- /d 4: 4 typically means READ-WRITE access, allowing both viewing and modification of SNMP-managed objects.
Step 3: Promote Server to a Domain Controller
Next, we use the following command to create a new forest and promote Server 1 (VM-DC01) to become a Domain Controller.
# Imports the relevant cmdlets for AD DS deployment into PowerShell
Import-Module ADDSDeployment

Get-Command -Module ADDSDeployment | Format-Table Name

# Deploy the first domain controller and forest
$ParamterToAdd = @{

DomainName           = "techexample.local"
DomainNetbiosName    = "TECHEXAMPLE"
DomainMode           = "7"
ForestMode           = "7"
DatabasePath         = "C:\Windows\NTDS"
LogPath              = "C:\Windows\NTDS"
SysvolPath           = "C:\Windows\SYSVOL"
InstallDns           = $true
CreateDnsDelegation  = $false
NoRebootOnCompletion = $false
Force                = $true

}

Install-ADDSForest @ParamterToAdd
- DomainMode “7” and ForestMode “7”: This corresponds to Windows Server 2016 or higher forest functional level.
During the execution, the server will restart automatically after completing the promotion process.
Note:
- You’ll be prompted to enter and verify a Directory Services Restore Mode (DSRM) password. You can skip this step by using parameter -SafeModeAdministratorPassword and provide a secure string representation of your password. For example:
Install-ADDSForest -DomainName "techexample.local" `
                   -SafeModeAdministratorPassword (ConvertTo-SecureString "YourSecurePassword" -AsPlainText -Force)
- If you’re frequently automating forest or domain creation processes, like in a lab setting, use this syntax to set the DSRM password to a specific value:
# Example 1:
$Password = ConvertTo-SecureString -String 'P@ssw0rd!' -AsPlainText -Force

# OR

# Example 2:
$Password = Read-Host -Prompt 'Enter SafeMode Admin Password' -AsSecureString

Install-ADDSForest -DomainName "techexample.local" `
                   -SafeModeAdministratorPassword $Password
Step 4: Verify the Installation
Log in to the server with the domain administrator account: Administrator@techexample.local
Open PowerShell and run the following commands to verify:
# To check the domain details:
Get-ADDomain

# To list the domain controllers in the forest:
Get-ADDomainController -Filter *
Installing an Additional Domain Controller
GUI Method
Step 1: Add another server to the domain
In Server 2, before joining the domain, we need to ensure the server has a static IP address, below is screenshot of the configuration:
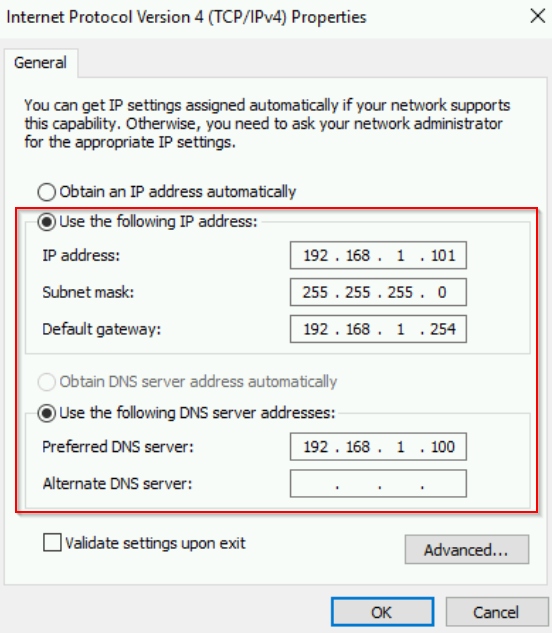
Next, test the connectivity to the Primary Doman Controller (Server 1), making sure it is reachable. Run the following command:
ping 192.168.1.100
Next, test the DNS resolution, ensure the domain name resolves to the primary DC’s IP. Use nslookup to resolve the domain:
nslookup techexample.local

Now, begin joining the Domain (GUI):
- Open Server Manager on the Server 2, in this example is VM-WS01.
- Click Local Server in the left pane.
- In the Properties pane, locate Workgroup and click the adjacent link labeled Workgroup or Change.
- In the System Properties window:
- Click the Change button.
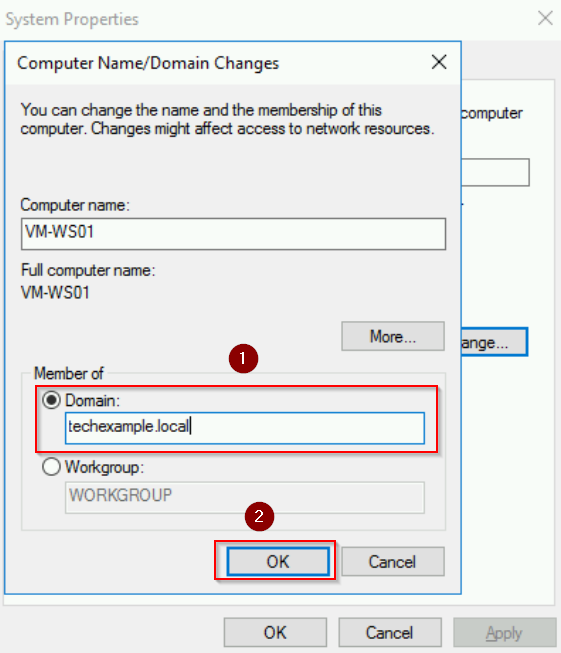
- Under Member of, select Domain and enter the domain name.
- Click OK.
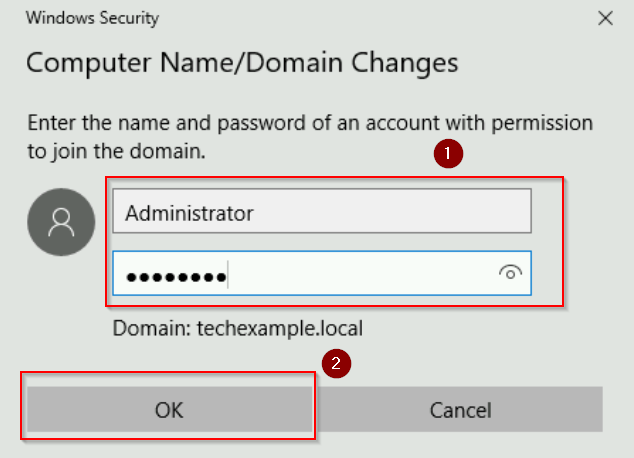
- Enter credentials for a domain account with the necessary privileges (e.g., a Domain Administrator account).
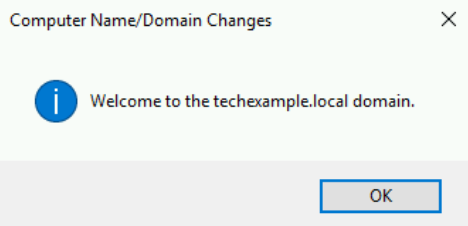
- After the server successfully joins the domain, you’ll see a welcome message.
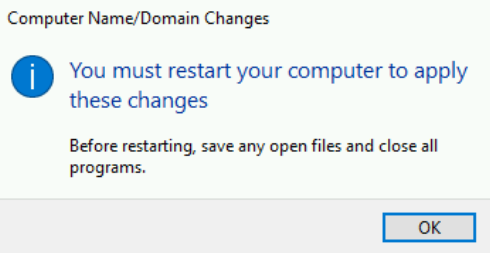
- Restart the server when prompted.
See screenshots of these steps below:

Step 2: Adding AD DS on Server 2
This step is the same as the one we just did on Server 1, (Setting Up a New AD Forest (GUI)) including:
- Open Server Manager on the additional server.
- Click Add roles and features in the Dashboard.
- Proceed through the wizard:
- Select Role-based or feature-based installation and click Next.
- Server Selection: Choose the local server (VM-WS01) and click Next.
- Server Roles: Check Active Directory Domain Services. When prompted, click Add Features.
- Keep the default selections for features and click Next.
- Review the information on the AD DS page and click Next.
- Click Install on the confirmation page.
- Wait for the installation to complete but do not restart the server yet.
Step 3: Promote the server to act as an additional domain controller
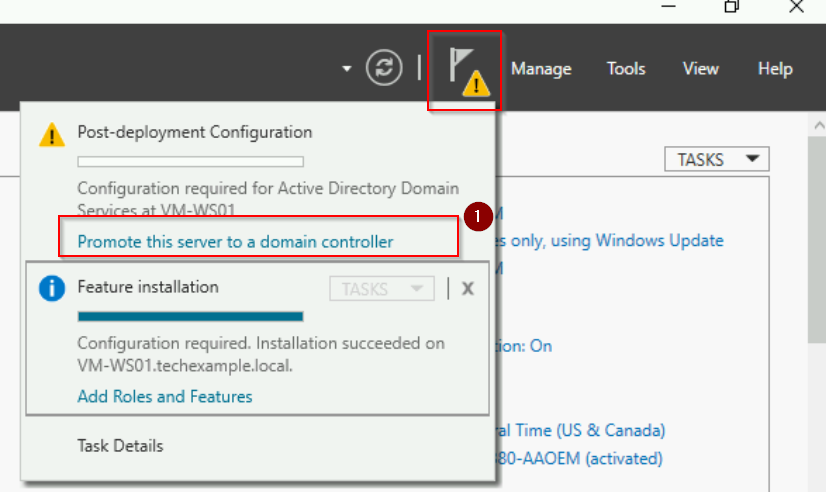
After the installation, click the Promote this server to a domain controller link in the notification area.
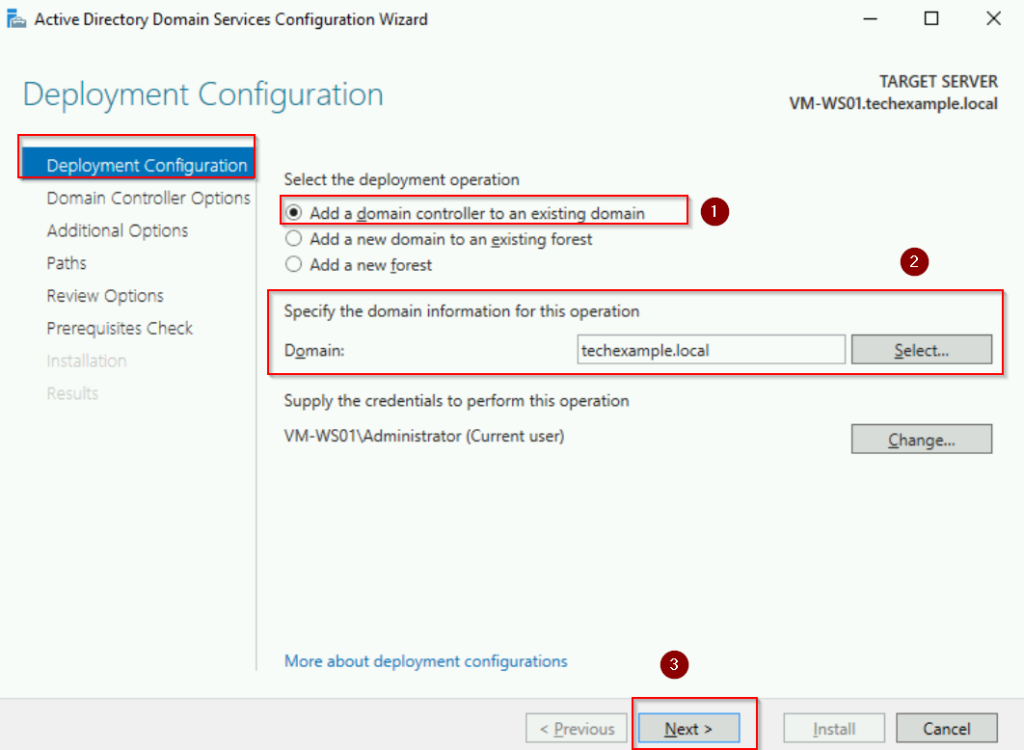
In the Deployment Configuration window:
- Select Add a domain controller to an existing domain.
- Enter the domain name, techexample.local and provide domain admin credentials if prompted.
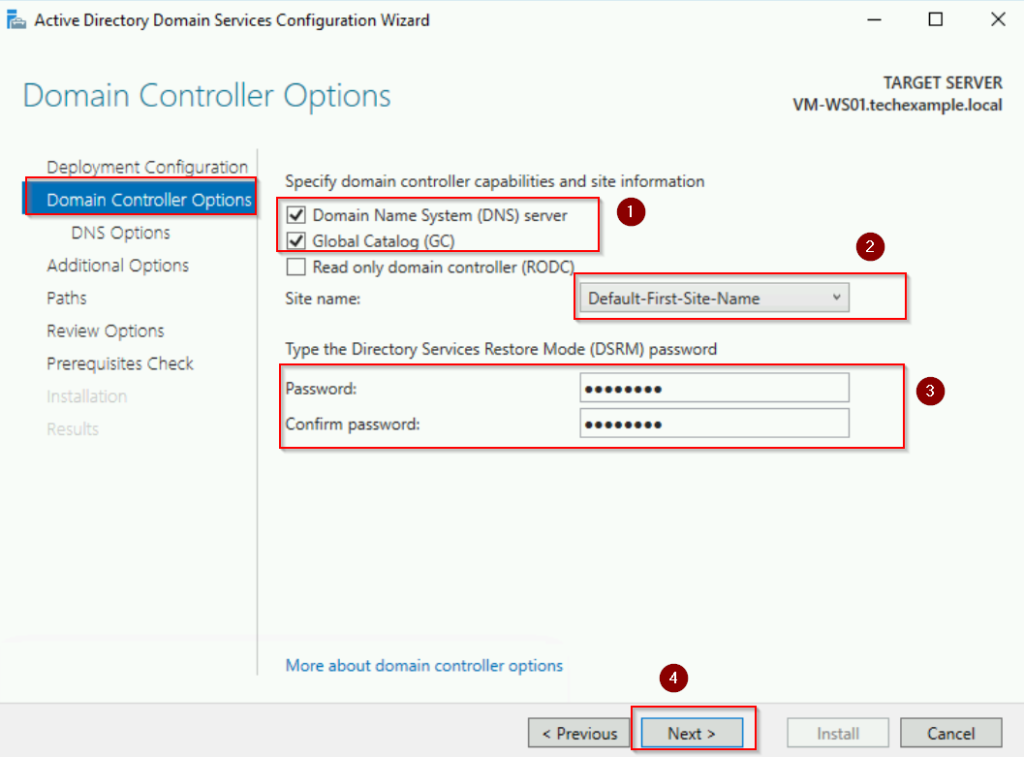
In the Domain Controller Options window:
- Select the desired roles (DNS Server and Global Catalog are selected by default).
- Enter the Directory Services Restore Mode (DSRM) password (used for recovery purposes) and click Next.
- See screenshots below:
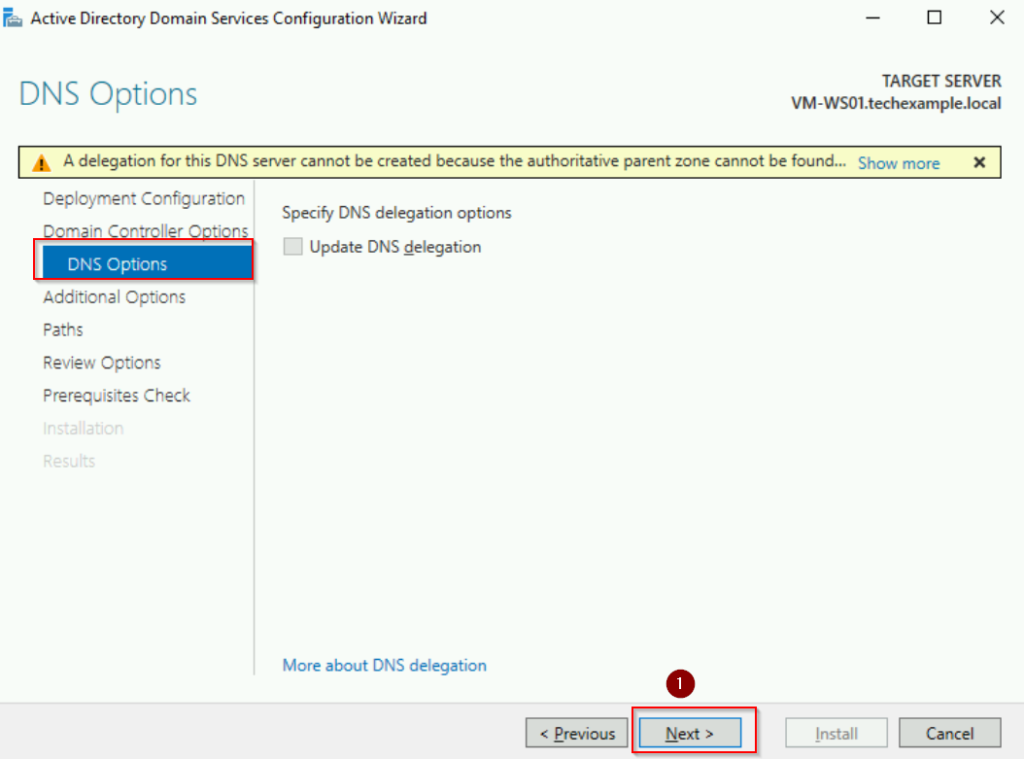
Leave default settings for DNS Options and click Next.
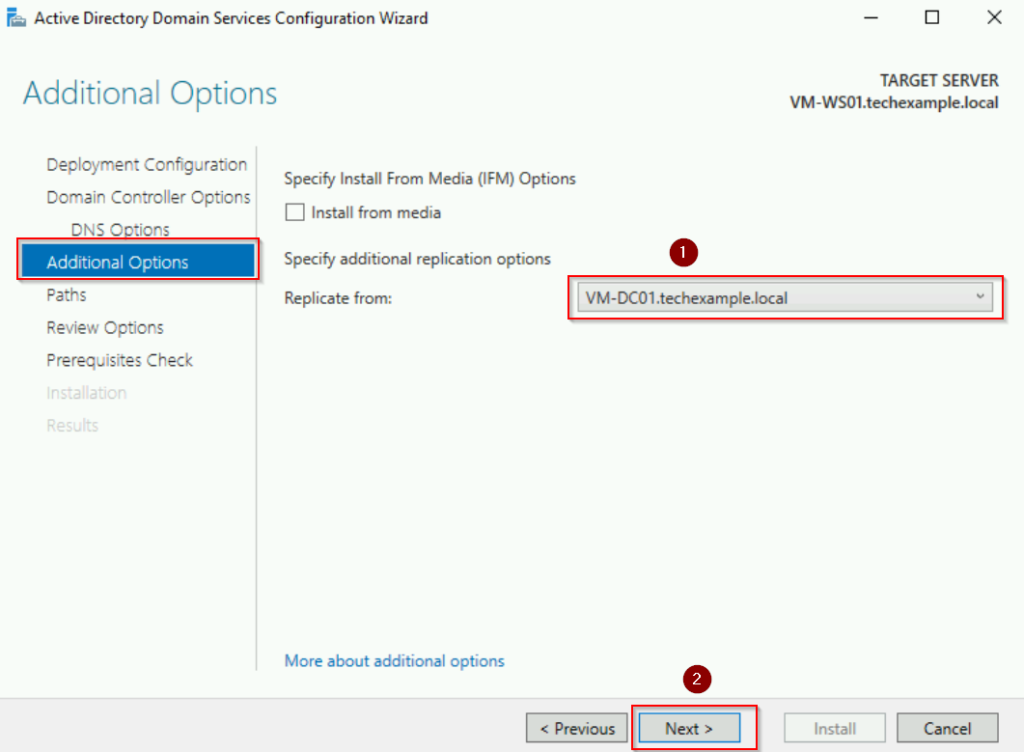
On the Additional Options page, verify the replication source, our primary DC (192.168.1.100) and click Next.
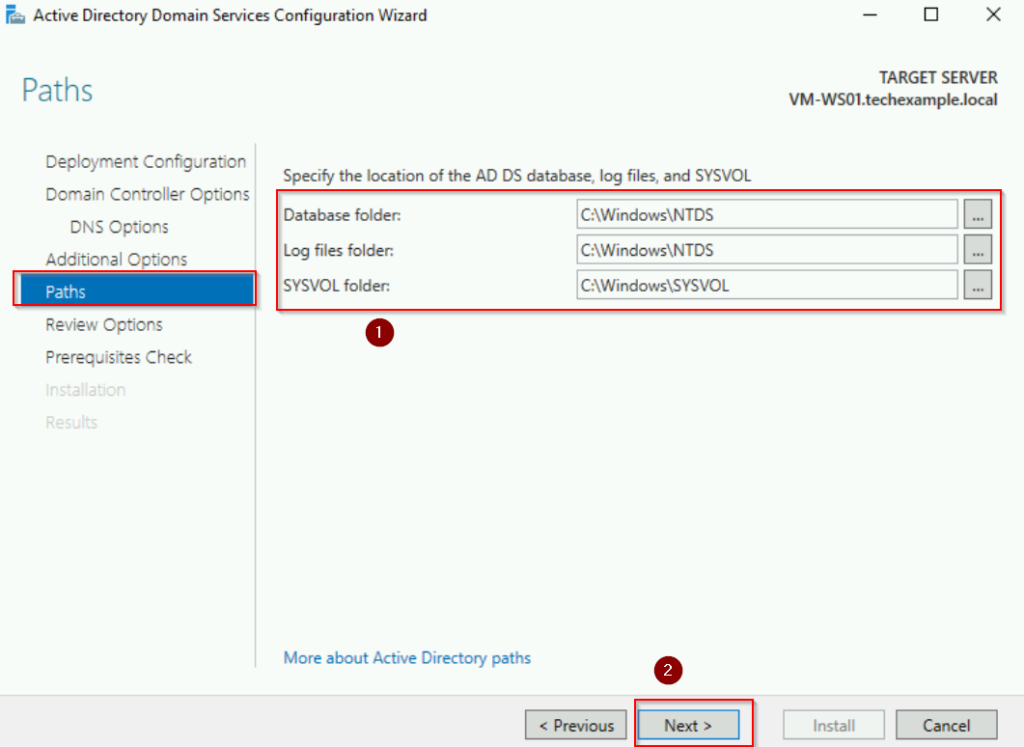
Accept default paths for the database, log files, and SYSVOL folder, and click Next.
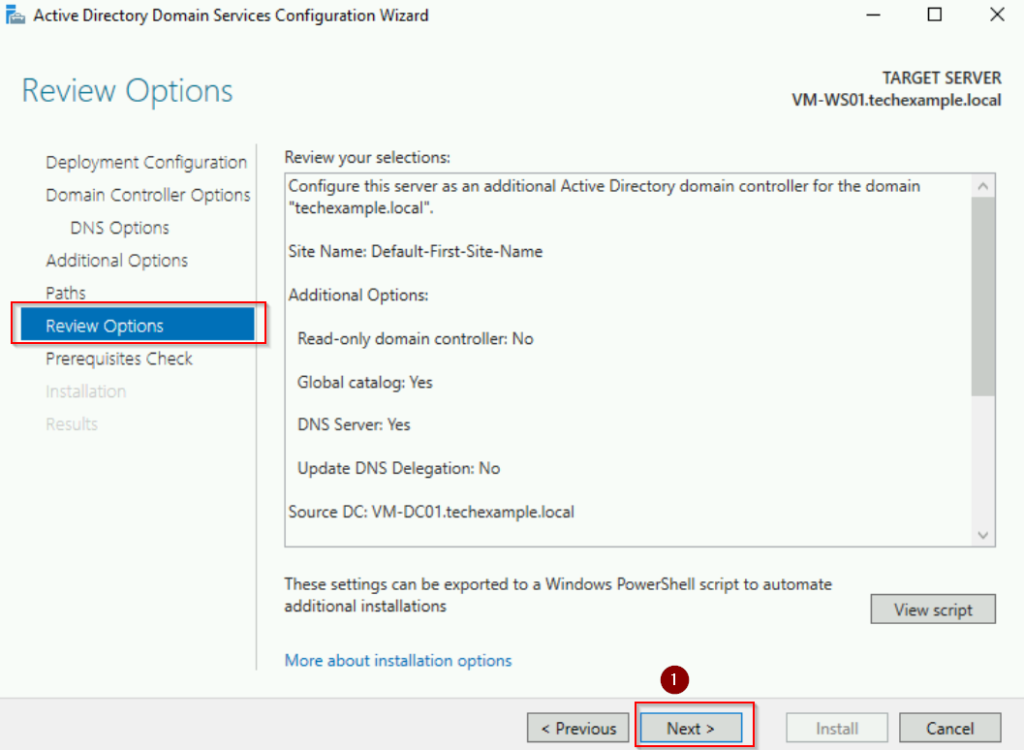
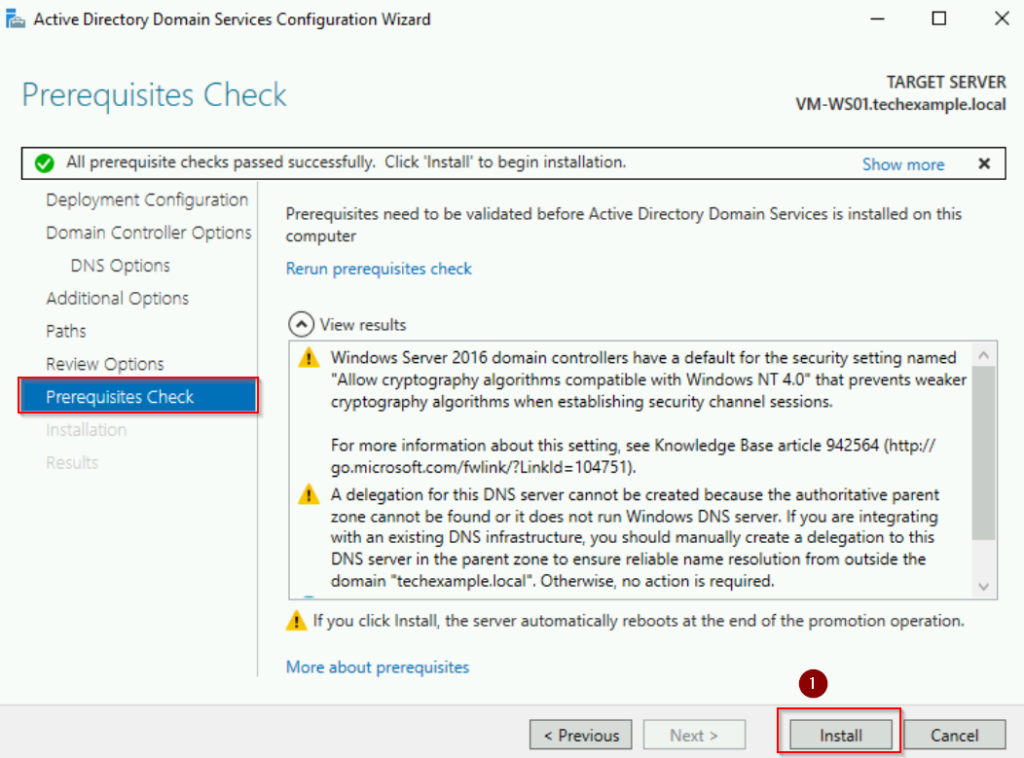
Review the configuration summary and click Install. The server will restart automatically after the promotion.
Step 4: Verify the additional domain controllers
After rebooting, check to see if the server is listed as a domain controller in Active Directory Users and Computers under Domain Controllers.

PowerShell Method
Step 1: Add another server to the domain
Open PowerShell as Administrator on the additional server (Server 2), then run the following command to join the domain:
Add-Computer -DomainName "techexample.local" -Credential (Get-Credential) -Restart
After the restart, confirm the server has joined the domain:
(Get-WmiObject -Class Win32_ComputerSystem).Domain
The output should display techexample.local
Step 2: Adding AD DS on Server 2
Open PowerShell as Administrator and run:
Install-WindowsFeature -Name AD-Domain-Services -IncludeManagementTools
Wait for the installation to complete.
Step 3: Promote the Server to an Additional Domain Controller
We use the following command to promote Server 2 (VM-WS01) to be secondary DC:
Install-ADDSDomainController -DomainName "techexample.local" `
                             -InstallDns `
                             -Credential (Get-Credential techexample\administrator) `
                             -DatabasePath "C:\Windows\NTDS" `
                             -LogPath      "C:\Windows\NTDS" `
                             -SysvolPath   "C:\Windows\SYSVOL" `
                             -SafeModeAdministratorPassword (ConvertTo-SecureString "YourDSRMPasswordHere" -AsPlainText -Force) `
                             -Force
After the command completes, the server will automatically reboot.
Step 4: Verify the Additional Domain Controller
After rebooting, use the following PowerShell commands to verify:
# Check the domain controller is registered
Get-ADDomainController -Filter *

# Test replication
repadmin /replsummary

# Test DNS functionality
nslookup techexample.local
Verify the Domain Controller and Additional Domain Controller
After setting up your Domain Controller (DC) and Additional Domain Controller (ADC), it’s crucial to verify their functionality and ensure proper replication and DNS resolution. Here are several methods to confirm everything is working as expected, you will see some methods we already covered in the earlier section.
Verify Domain Membership
On the Additional DC (VM-WS01), confirm it has joined the domain by typing this PowerShell commands:
(Get-WmiObject -Class Win32_ComputerSystem).Domain

$env:USERDOMAIN
The output should display the domain name, techexample.local
You can also this command to check whether the Domain Controller is registered:
Get-ADDomainController -Filter *
Ping the Domain
From a client machine or the Domain Controller, test connectivity by typing:
ping techexample.local
The result should resolve to the IP address of your Domain Controller and Additional DC.
Test DNS Resolution
On your Primary DC and Additional DC, use nslookup to confirm that DNS is resolving correctly. The output should return IP address of your Primary DC (192.168.1.100) and Additional DC (192.168.1.101).
nslookup techexample.local
Next, we confirm self-resolution for each DC. On Primary and Secondary DC, type:
nslookup 127.0.0.1
The output should show techexample.local
Tool like dcdiag can be used to monitor DNS health:
dcdiag /test:dns
Verify AD DS Health
On each DC, use the dcdiag command to run a comprehensive diagnostic. Look for PASS messages, especially for Connectivity, Replication, DNS health:
dcdiag
Verify Replication
Check the replication status between the DC and Additional DC using command:
repadmin /replsummary
The output should show no errors and that replication is occurring successfully.
You can also have a detailed view of replication partners using command:
repadmin /showrepl
The output should show replication status for each naming context.
Test Authentication
Log in to a domain-joined client or server using the format:
- techexample.local\<username>
- username@techexample.local
Verify SYSVOL and NETLOGON Sharing
Confirm the SYSVOL and NETLOGON shares are active on both DCs. If you can access these folders, the domain controller is sharing Group Policy and logon scripts properly.
Run the following commands on both DCs. The output should display the SYSVOL and NETLOGON shares:
net share
We can further check replication of SYSVOL folder by creating a test file in the SYSVOL folder of the primary DC:
C:\Windows\SYSVOL\domain\scripts\testfile.txt
Verify that it replicates to the SYSVOL folder on the additional DC.
Confirm Global Catalog Role
Verify if the additional DC (VM-WS01 )has been promoted as a Global Catalog server. Open PowerShell and run:
Get-ADDomainController -Filter {IsGlobalCatalog -eq $true}
The output should list both DCs if the ADC is a Global Catalog server.
Conclusion
To sum up, understand the structure of an Active Directory Forest, the role of the forest root domain, and the importance of having multiple domain controllers are crucial for maintaining a secure and resilient network. Through this blog, we explored these concepts and demonstrated how to implement them with a hands-on lab.
