Introduction
Activating your Windows Server is crucial to unlock its full potential and avoid any limitations that come with the evaluation version. In this guide, we will show you how to convert an evaluation version to a retail version and activate it using a license key.
Understanding slmgr and dism
Both slmgr and dism are command-line tools used for different aspects of managing Windows operating systems, including licensing and activation. Here’s a breakdown of their uses and differences:
slmgr (Software Licensing Management Tool)
slmgr is primarily used for managing Windows licensing and activation.
Common commands:
- Installing a product key: slmgr /ipk <product-key>
- Activating Windows: slmgr /ato
- Checking license status: slmgr /dlv
- Extending the evaluation period: slmgr /rearm
Use Case: Use slmgr tool when you need to manage the licensing aspects of Windows, such as installing a product key, activating the system, checking the license status, and extending the evaluation period.
dism (Deployment Imaging Service and Management Tool)
dism is used for servicing and preparing Windows images, including adding and removing features, updating packages, and converting Windows editions.
Common commands:
- Converting Windows editions: dism /online /set-edition: /productkey: /accepteula
Use Case: When you need to convert the Windows Server edition from evaluation to a retail version or perform more advanced servicing tasks on the operating system, dism is the appropriate tool. You need to use the dism tool to convert the evaluation version to the retail version first, and then use slmgr to activate it.
Prerequisites
Before we begin, ensure you have the following:
- An evaluation version or retail version of Windows Server installed. In this example, we choose Windows Server 2019.
- A valid standard license key.
- Administrative privileges on the server.
Let’s get started!
Section 1: Activating a Retail Version
If you already have a retail version of Windows Server 2019 installed:
Step 1: Open Command Prompt as Administrator
Open the Command Prompt with administrative rights. Press Win + X, then select “Command Prompt (Admin)”. This ensures that you have the necessary permissions to make changes to the system.
Step 2: Install the License Key
Run the following command to install the product key:
slmgr /ipk <your-license-key>Replace <your-license-key> with your actual license key.
Step 3: Activate the Server
Run the following command to activate the server:
slmgr /atoYou should see a confirmation message if the activation is successful.
Section 2: Converting an Evaluation Version to Retail
If you have an evaluation version of Windows Server, you need to convert it to the retail version first. Here is how you do it:
Step 1: Open Command Prompt as Administrator
Open the Command Prompt with administrative rights. Press Win + X, then select “Command Prompt (Admin)”. This ensures that you have the necessary permissions to make changes to the system.
Step 2: Convert the Evaluation Version to a Retail Version
Run the following command to convert the evaluation version:
dism /online /set-edition:ServerStandard /productkey:<your-license-key> /accepteulaReplace <your-license-key> with your actual license key. The server will need to restart after running this command.

Step 3: Verify the Installation
After the server restarts, check the version to ensure it’s now the standard edition:
systeminfo | findstr /B /C:"OS Name" /C:"OS Version"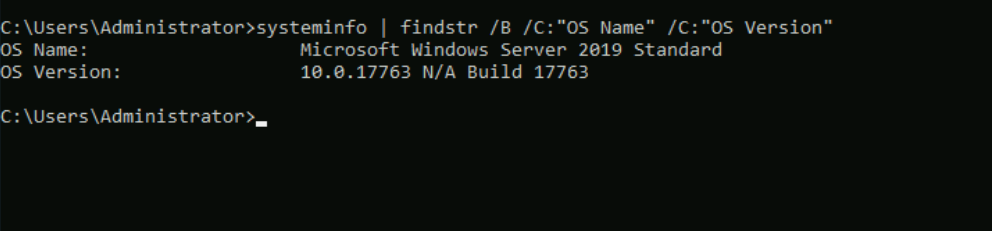
- systeminfo : this command generates a details report about the system configuration.
- /B : the /B switch specifies that the search pattern must match the beginning of a line.
- /C:”OS Name” and /C:”OS Version” : it tells findstr to search for the exact strings “OS Name” and “OS Version”.
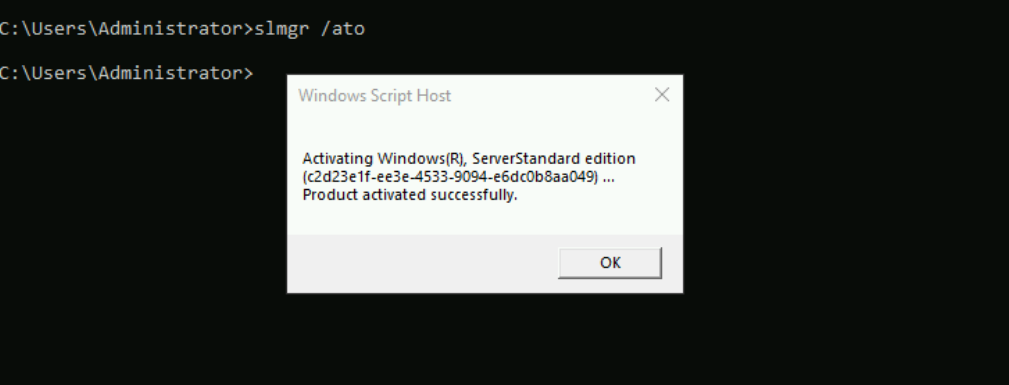
Step 4: Activate the Server
Run the following command to activate the server:
slmgr /atoYou should see a confirmation message if the activation is successful.
Section 3: Extending the Evaluation Period
If you still using the Evaluation Edition of Windows Server and decide not to convert immediately, you can extend the evaluation period.
Step 1: Check the Current License Status
To check how much time is left in your evaluation period, run:
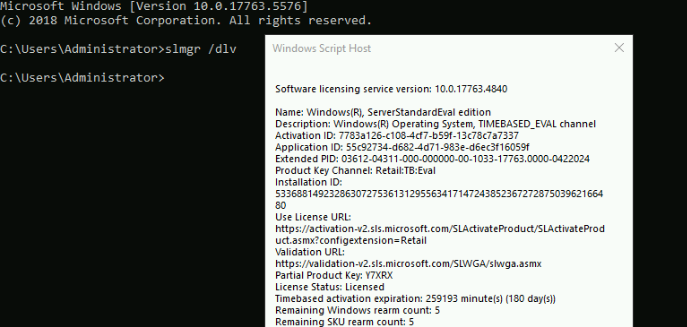
slmgr /dlvThis will display detailed license information, including the remaining evaluation period. See screenshot below:
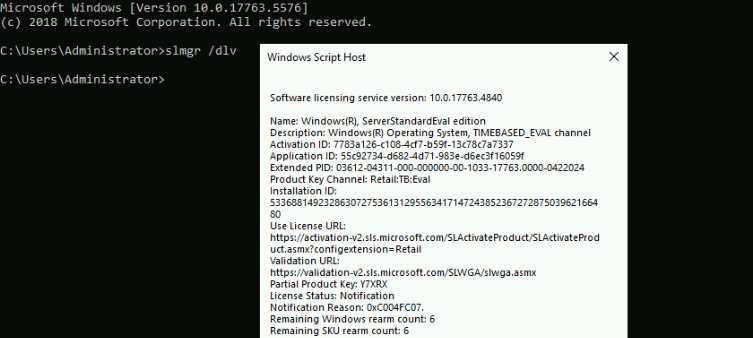
From the image we can see that :
- Notification Reason: 0xC004FC07: the evaluation period for this Windows Server Standard Evaluation edition has expired.
- Remaining Rearm Count: 6 , this indicates the number of times the system can be reactivated before requiring a valid product key.
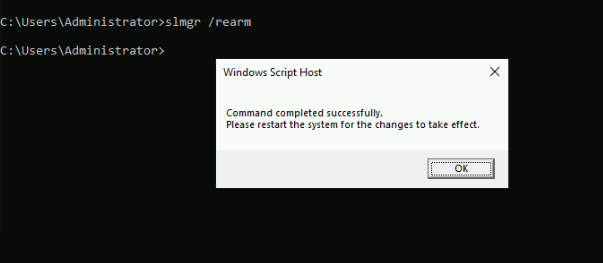
Step 2: Extend the Evaluation Period
To extend the evaluation period, run:
slmgr /rearmThis command resets the evaluation timer. Note that you can only use this command up to five times. After running the command, restart your server.
Step 3: Verifying the Extension
After restarting, you can verify the new evaluation period by running:
slmgr /dlvCheck the output to ensure the evaluation period has been extended. In the following screenshot, you see the License Status is Licensed with the remaining Windows rearm count is 5.
Troubleshooting
If you encounter any issues, here are some common problems and solutions:
- License key errors: Double-check the key and ensure it’s valid for Windows Server 2019.
- Activation failures: Ensure your server has internet access and try again. If the issue persists, contact Microsoft support.
- Evaluation period extension issues: Make sure you haven’t exceeded the maximum number of re-arms (5 times).
Conclusion
That’s it, activating Windows Server 2019 and managing the evaluation period is straightforward with the right commands. Make sure your server is properly licensed to take full advantage of its features. For more information, check out the official Microsoft documentation and support resources.